


 In-depth articles, series and guides

Ever since I got a MacBook in 2015, I’ve been a fan of the MacBook trackpad.
It’s the smoothest and most functional trackpad I’ve ever used.
The swipe and pinch gestures made the experience of macOS tenfold better.
So:
Although I’ve flirted with the idea of setting up a desk set up with an external keyboard and mouse, I’ve been reluctant.
It was hard to go back to a mouse after using the MacBook trackpad.
That was until I found the perfect mouse for my needs.
In this post, I’ll talk about why I switched back to a mouse set up over a trackpad and why I think the MX Master 3 is a gamechanger.
Let’s start with:
Why I wanted to switch back to a mouse
While I enjoyed using my MacBook, I wanted to have a desktop set up at my home.
Using a laptop over an extended period is not the best idea because we often tend to have a slouching body posture while using a laptop on a desk.
Now:
I could’ve put my laptop on a stand to bring the screen to my eye level and called it a day, but it creates a different problem.
Typing on a laptop keyboard mounted on an elevated stand is a cause of wrist problems.
A desktop works perfectly here because the monitor is elevated as much as it needs to be while the keyboard and mouse stay at desk level.
But:
Since my MacBook worked fine, it made no sense to shell out a couple of thousand dollars for an iMac.
The next best option was to convert my MacBook to a desktop set up using an external keyboard and a mouse.
I could use a laptop stand to lift my MacBook display to my eye level, keeping the external keyboard and the mouse at desk level.
Similar to a traditional desktop computer setup.
While this setup sounded like an easy win, I was a bit reluctant to go back to a mouse because I would be missing out on the fantastic features that the MacBook trackpad offers.
Some of the functionalities of the trackpad I heavily used were:
- The 3-finger swipe to switch windows
- The smooth scrolling of the trackpad
- Pinch to zoom in and out
- Force touch to look up word meanings
Moving to a mouse setup would mean losing all these fantastic gestures because no mouse other than the Magic Mouse supported these.
And from the times I’ve tried using the Magic Mouse in an Apple Store, the experience wasn’t exactly pleasing.
Now:
There’s the Magic Trackpad, but it’s super expensive.
After some digging around, I landed on a mouse that promised the wonderland I was searching for:
The Logi MX Master 3
When I landed on the product page of this mouse, it seemed like a dream come true.
The 3-finger swipe gesture on a mouse?
Shut up and take my money.
Cherry on top?
The mouse looked beautiful and futuristic. Have a look:

After due diligence of all the features, I placed an order for this mouse.
I’ve been using this mouse for around four months now, and it’s safe to say that I don’t miss the trackpad anymore.
Here’s why:
Support for the macOS 3-finger swipe gesture
If you’ve been using ⌘ + Tab all your life to switch windows, here’s how the 3-finger swipe works:
Put three fingers on a MacBook trackpad and swipe left or right.
If your apps are maximised to full-screen mode, you can switch between apps smoothly like this:

Although this might seem counterintuitive over the ⌘ + Tab approach when you have a dozen windows in full screen, I enjoy using it.
This has been one of my most loved macOS features.
Thankfully:
The MX Master 3 supports this gesture out of the box.
The mouse has a gesture button near the thumb rest which makes this gesture possible:
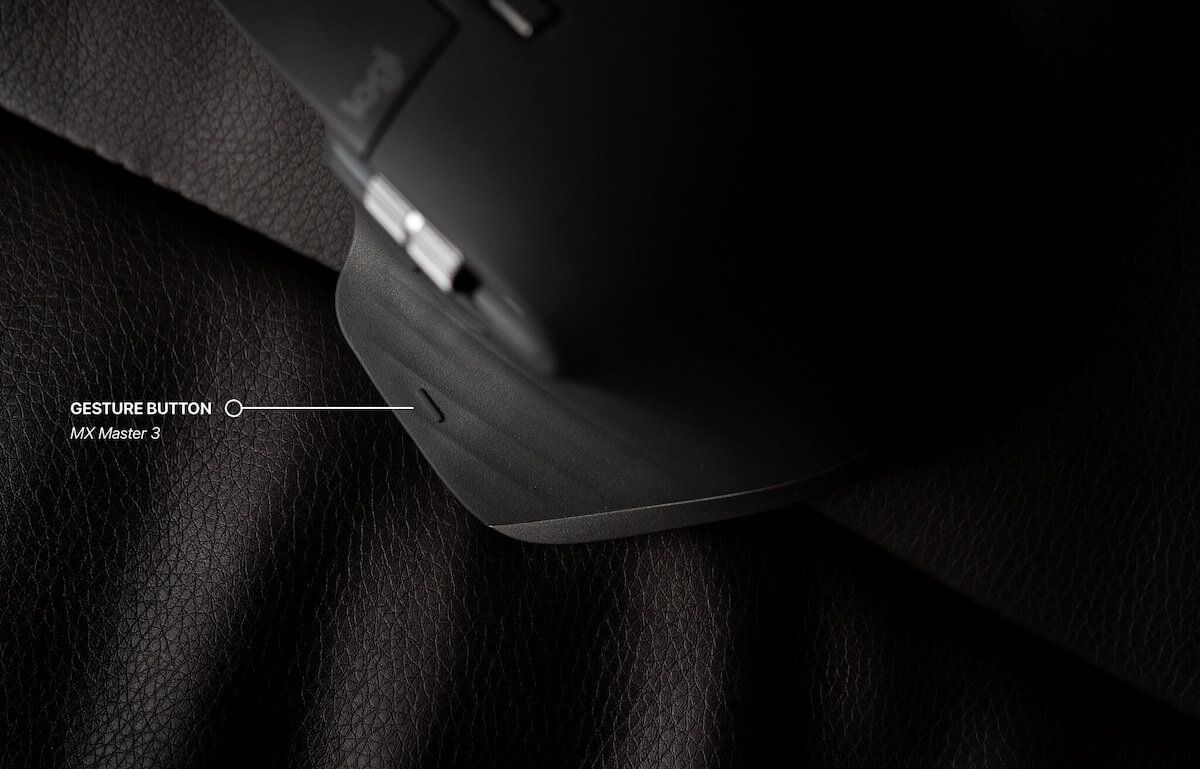
Here’s how:
Press and hold the gesture button with your thumb and then move the mouse left or right.
This action will emulate the 3-finger swipe on macOS.
Initially, I had trouble adjusting to this action, but after a few days, it became second nature.
Now I don’t even have to think of this compound action consciously. It simply happens.
So:
While I was happy that I got my most wanted feature on the MX Master 3, there’s this one functionality that no mouse or trackpad can match.
And that is:
The ability to scroll through a bazillion lines with a flick
The MX Master 3’s scroll is an absolute engineering wonder.
With a single flick, you can scroll past thousands of lines on your screen in the blink of an eye.
Here’s an example:

This feature is helpful in swiftly scrolling long pages, file lists or getting to those seemingly unreachable website footers.
Talking about scrolling, the MX Master 3 has a horizontal scroll wheel too:

This scroll wheel comes in handy when scrolling through zoomed-in photos or those super-wide spreadsheets.
Although this functionality might not seem like a God-send, it’s a nice touch.
Also:
The mouse has a button to switch between the following scrolling modes:
- Firm: With this mode, the scroll wheel acts like a regular firm scroll wheel, giving precise scrolling actions. I usually use this mode because it gives me a controlled scroll.
- Freewheel: In this mode, the scroll wheel acts like a freely rotating wheel. It’s buttery smooth, and a single flick can travel kilometres of screen space.
Here’s the button that does this magic:

However, with the MX Master 3, you can change the placement of the wheel mode button if you don’t like the default option.
Talking more on those lines:
The MX Master 3 allows you to program all the buttons
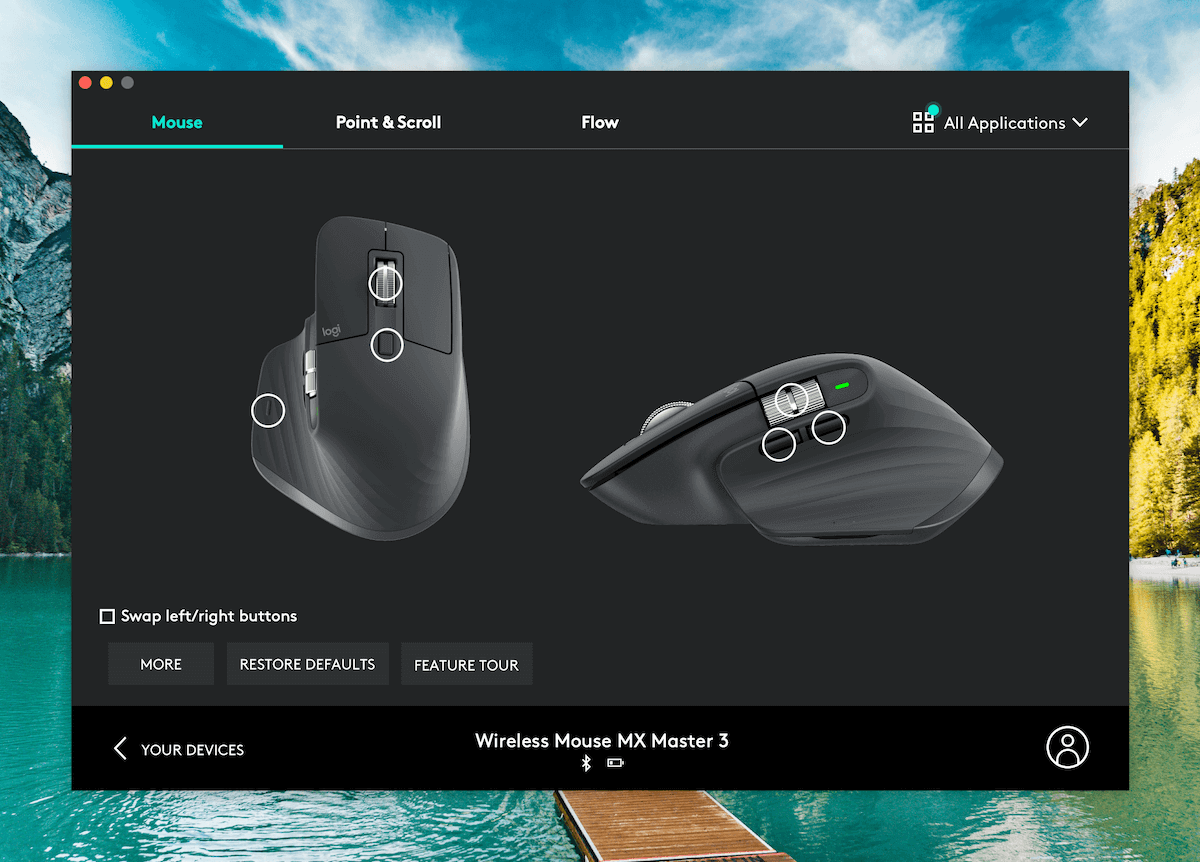
The MX Master 3 comes with the Logi Options app that you can install on your system, be it macOS or Windows and configure the mouse completely.
For example:
If you don’t like the placement of the gesture button, you can switch it to a different button.
Here’s how the control panel looks like:
Also:
The mouse has two buttons on the side which acts as back and forward buttons in some apps like the browser by default.
You can, however, configure them to perform any supported action you want.
Therefore:
More buttons for you to configure according to your workflow.
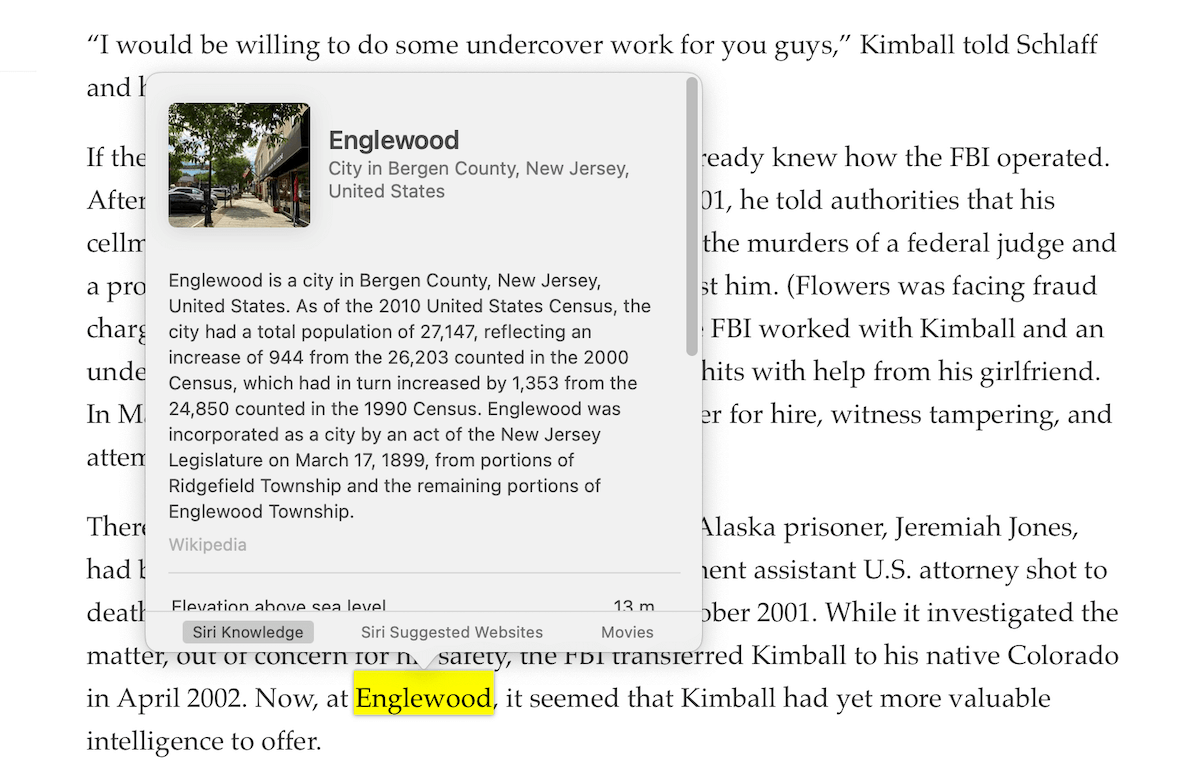
I took advantage of these customisation options and set the scroll wheel to act as the macOS Force Touch action on click.
So:
Whenever I want to look up a word or preview a link, I hover my cursor over the area and click my scroll wheel to trigger a force touch, like this:
Now:
Talking about a smooth operation:
The MX Master 3 glides through any surface
Logi built this mouse with their Darkfield tracking technology.
This means that you can use the mouse on any surface you want.
I’ve tried operating the mouse on surfaces like glass, sofa fabric, ceramic tiles and wood, and it worked flawlessly everywhere.
Now:
Just because this mouse will work on any surface doesn’t mean you should use it on rough surfaces.
During the first couple of days, I tried using this mouse on a granite countertop, and although I had no problem using the mouse, I got this:

The bottom pads were starting to scratch and scrape off.
So:
It’s wise not to get lost in the advertising and instead use this mouse like a sane person would do — over a mouse pad or a desk mat.
Your mouse will last longer and be of more value to your money.
Talking about value for money:
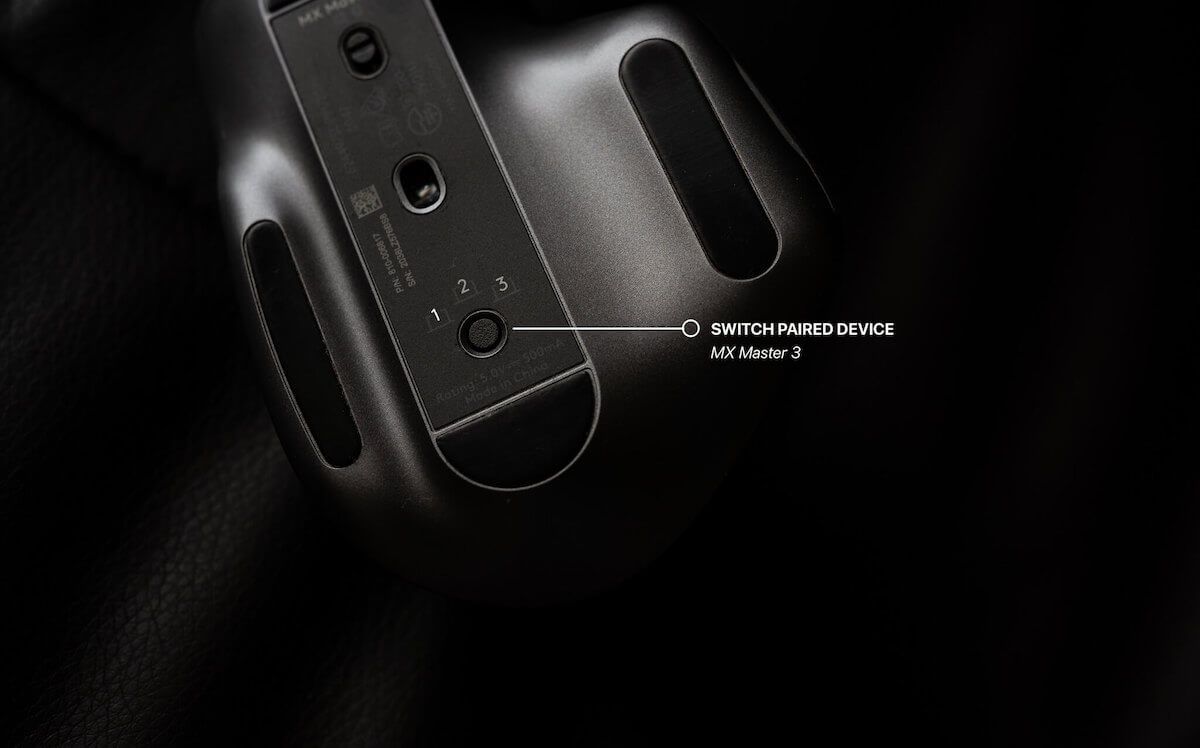
This mouse can seamlessly connect to up to 3 devices
One of the latest additions in Logi’s most products is multi-device support via Bluetooth.
And the MX Master 3 is no different.
You can use this button below the mouse to pair it with up to three of your devices:
So:
If you have multiple devices at home like an iPad, a laptop and a desktop, you can pair the mouse with all of them.
Switching from one device to another is as easy as a click of a button.
Although I don’t use this mouse on multiple devices, I know the value because I use the same external keyboard with my MacBook and iPhone.
Right now:
I’m using a Logi K480 keyboard with my iPhone to write this post.
Once done, I’ll switch it to connect to my MacBook and continue using the keyboard on my laptop.
So:
No more pairing and unpairing. Switch to whichever device you need the mouse on at the moment.
Quite handy.
Now:
Another fantastic thing about the MX Master 3 is:
The seemingly everlasting battery life
In the four months of using the MX Master 3, I’ve charged it only twice.
Once when I bought it. Another about a month ago.
Even with all of the heavy lifting that the mouse does, supporting so many actions, it manages the battery efficiently.
Initially:
I used to turn off the mouse after I was done with the day’s work and turn it back on the following day.
But after experiencing the battery life on this thing, I leave it on all the time now.
And charging it is easy because I can charge it with any USB-C cable connected to my MacBook.
This is another solid plus point of this mouse to have a USB-C charging input rather than some proprietary charging port.
Since most devices use USB-C these days, I don’t need to have another cable lying around to charge the mouse.
Now:
Regardless of all the fancy features, a good mouse should be comfortable to hold.
Thankfully:
The MX Master 3 is a delight to hold
I like how the mouse offers a thumb rest to naturally place my thumb on the pad when I’m using the mouse.
On top of that:
The design of the mouse and the button placements makes it super easy to operate this mouse like a ninja:

I’ve used plenty of mice before, but this one hits the ball out of the park on ergonomics.
Now that we’ve seen what the MX Master 3 is capable of:
Let’s talk money
The MX Master 3 is by no standard an affordable mouse.
It comes at around ₹7,600(~$102.5) and is priced well above several mouse options in the market.
However:
If you have the money to spend on a mouse, this mouse will pay you back with a box full of saved time and enjoyment.
I would’ve never imagined that I would spend ₹7,600 on a mouse, but I’ve never regretted this purchase.
And:
Even if I get an iMac in the future, I think I’ll continue using the MX Master 3 with the iMac.
The mouse is worth every penny spent on it.
So:
What’s the verdict here?
If you’re in for a new mouse and have a budget of around $100, go for the Logi MX Master 3.
This will be an all-rounder mouse and is one of the best computer mice money can buy.
However:
If you’re not particularly rigid about the gestures feature or fast scrolling, you might want to save some money by going for a cheaper alternative.
Did you enjoy reading this review?
Let me know over email or Twitter which products you’d like to see reviewed on the Hulry.


