


 In-depth articles, series and guides

It’s the year 2020, and everyone’s sending a newsletter.
With newsletter services like Substack and Revue, reducing the friction to start a newsletter, it has become a lucrative approach to build an audience.
Although some newsletters provide tremendous value in every issue that hits the inbox, a lot of others are just fluff.
With more and more newsletter subscriptions, it’s becoming harder and harder to have a sane inbox.
Our email inboxes are becoming so cluttered day by day that it leads to:
- Our inbox becoming a constant source of distraction.
- A problem where it’s pretty hard to spot a vital email amidst the useless ones.
In this post, I’ll be showing you how I deal with the newsletter fatigue, and how you can replicate my process to keep your email inbox meaningful.
Let’s get started with:
Making a habit of unsubscribing
Over the years, I’ve followed the process of unsubscribing to what I don’t need, one email at a time.
I developed this habit years back when I was done with having my inbox cluttered with marketing emails I didn’t need or never subscribed.
This is how the process looks. Whenever I see a newsletter or a promotional email:
- I open the email and see if it contains something relevant to me.
- If the email is useful, I keep it, or else I scroll to the bottom and click the unsubscribe link.
Every newsletter or marketing email is required to have an unsubscribe link by the CAN-SPAM act.
So, most emails if not all will have an unsubscribe link present in the email body.
I have repeated this process so many times that it has become a habit. I don’t need to remember to do the above steps actively.
Seeing the newsletter is my trigger. Unsubscribing is the action that follows.
Here’s an example:
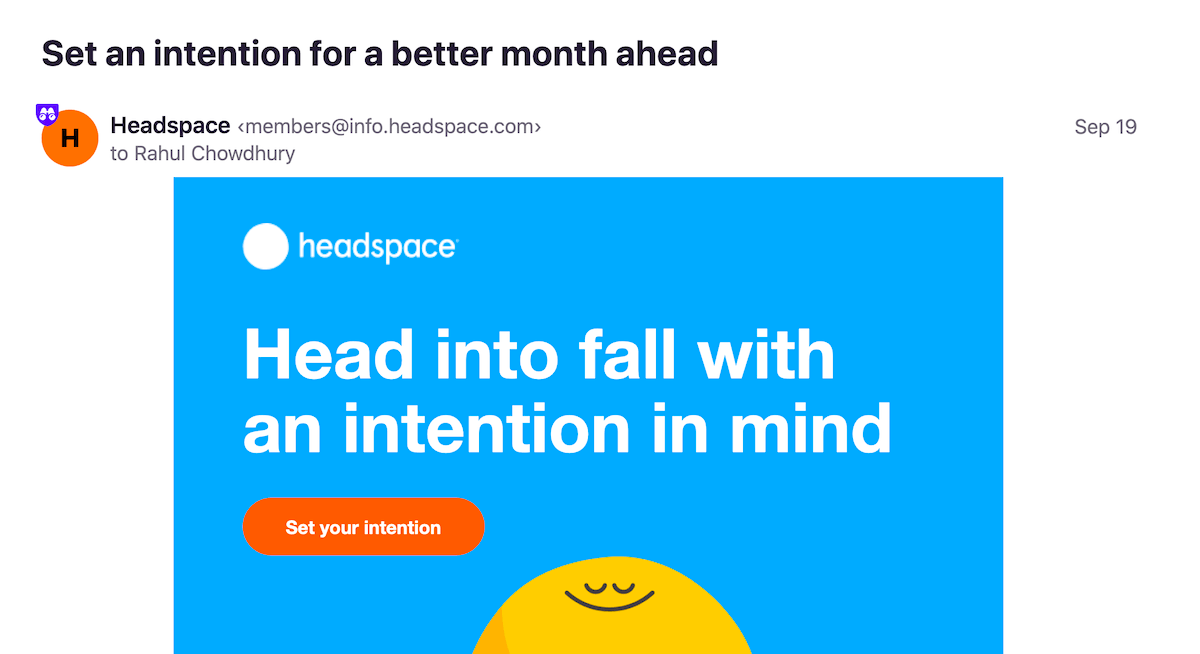
While scrolling through my HEY feed page, I spotted a marketing email from Headspace that I don’t remember subscribing.
Now, there can be two cases:
I might have subscribed to this newsletter in the past, and I don’t remember it anymore.
Or, like most companies, Headspace felt it was entitled to send me marketing spam just because I signed up for their product.
Anyway, I checked out the email, and I didn’t like what I saw. It was irrelevant to me, and I didn’t want these emails to clutter my feed.
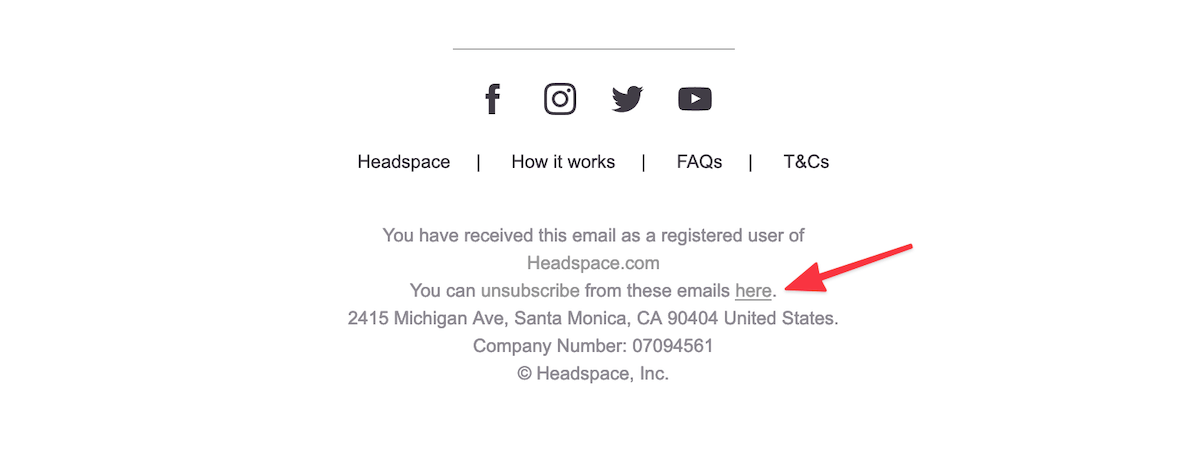
Following my process, I scrolled to the bottom, and clicked the unsubscribe link:
This process might sound a little tedious to you, but once you get the hang of it, it’s easy to follow.
One thing to note here:
In the beginning, it’ll take some time to plough through the mess, but after a few rounds of cleanup, you won’t need to follow this process often.
Your inbox will be calmer and more relevant.
However, to ease up the initial few cleanup rounds, you can:
Use an email cleanup app
When I started cleaning up my inbox, Unroll.me was the only available option.
However, Unroll.me was caught selling user email data to companies like Uber for their marketing campaigns.
This meant that if I used Unroll.me for cleaning up my inbox, I would be handing over my historical email data for sale.
It wasn’t a surprise. A free service will always rely on our data to keep the lights on.
I was not willing to give my emails away, so I chose what was behind door no. 1 — unsubscribe manually.
But now:
There are ethical and paid products to do the job, like LeaveMeAlone.
Their privacy policy is quite friendly, and one of the USPs of the service is that they don’t sell user data.
Here’s how you can use LeaveMeAlone to clean up your subscriptions list:
Once you login to the app and connect your inbox via Google, Outlook or IMAP sign in, you’ll get a list of your subscriptions like this:
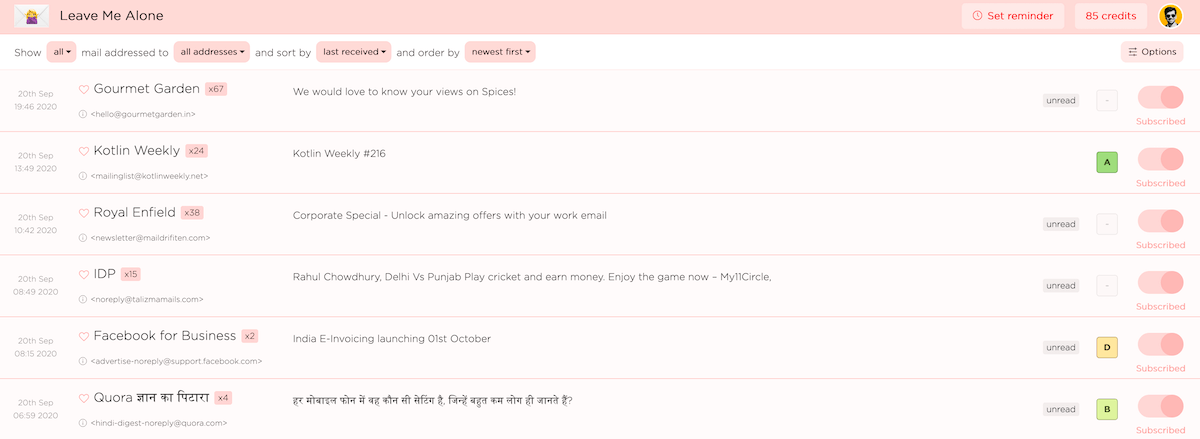
Over half of the emails above are spam. I never opted to receive these emails.
To unsubscribe from an email, I toggle the “Subscribed” switch like this:
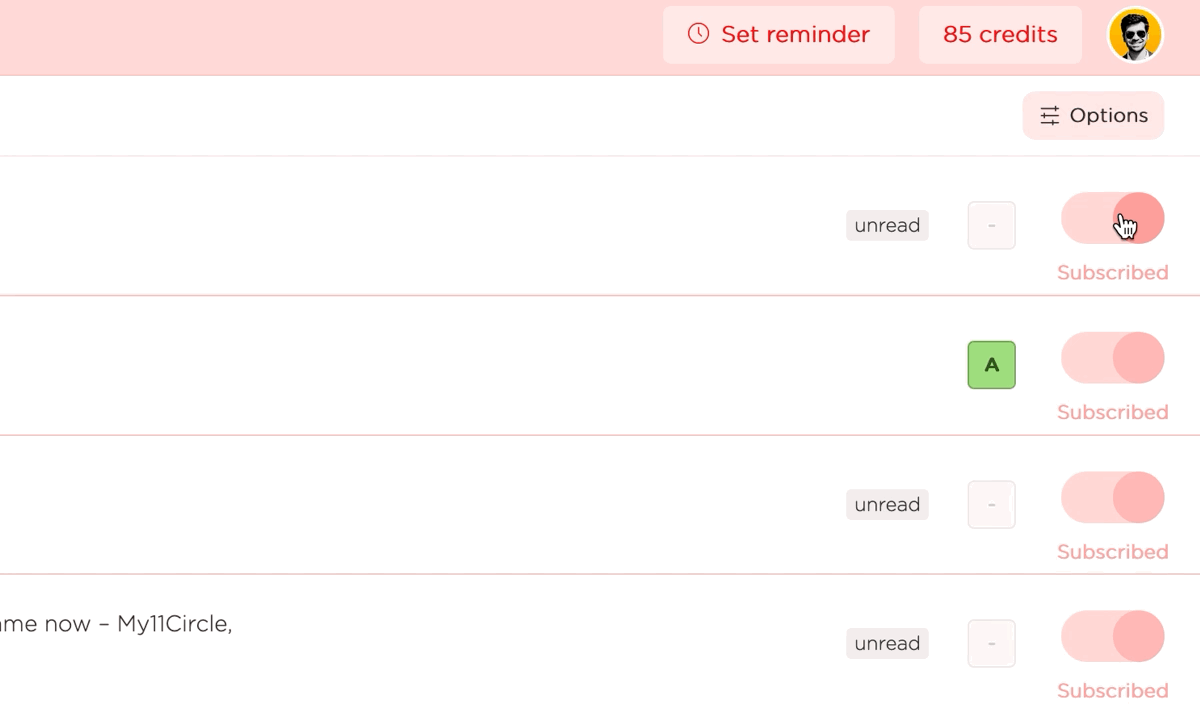
A few seconds of processing and I’m unsubscribed from the email list.
Apart from the ease of unsubscribing, a handy feature in the app is the subscription score.
On every email item, you can see a score like this:
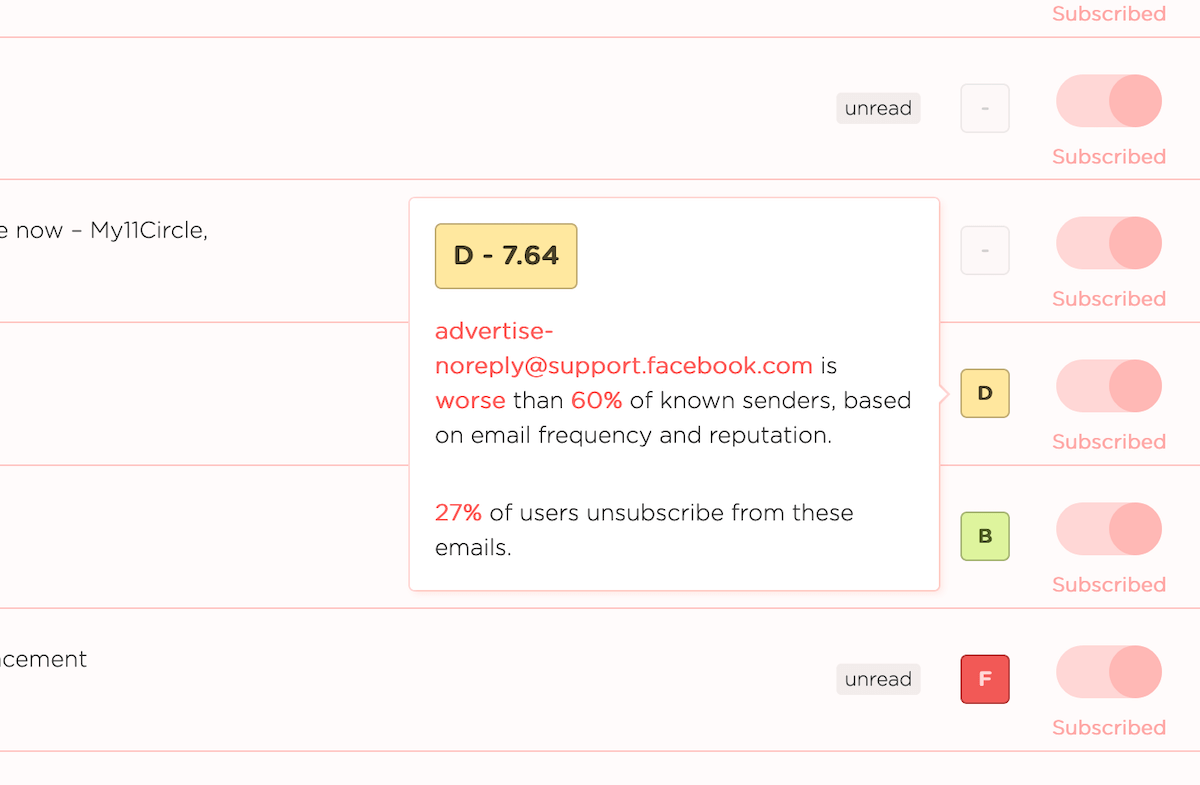
This score indicates the spamming nature of the sender.
Also, here’s the icing:
LeaveMeAlone doesn’t invade on user privacy while collecting data for this feature.
All they collect is the email metadata like sender information, no. of times an email has been unsubscribed from, etc.
This information is not tied to a specific user account.
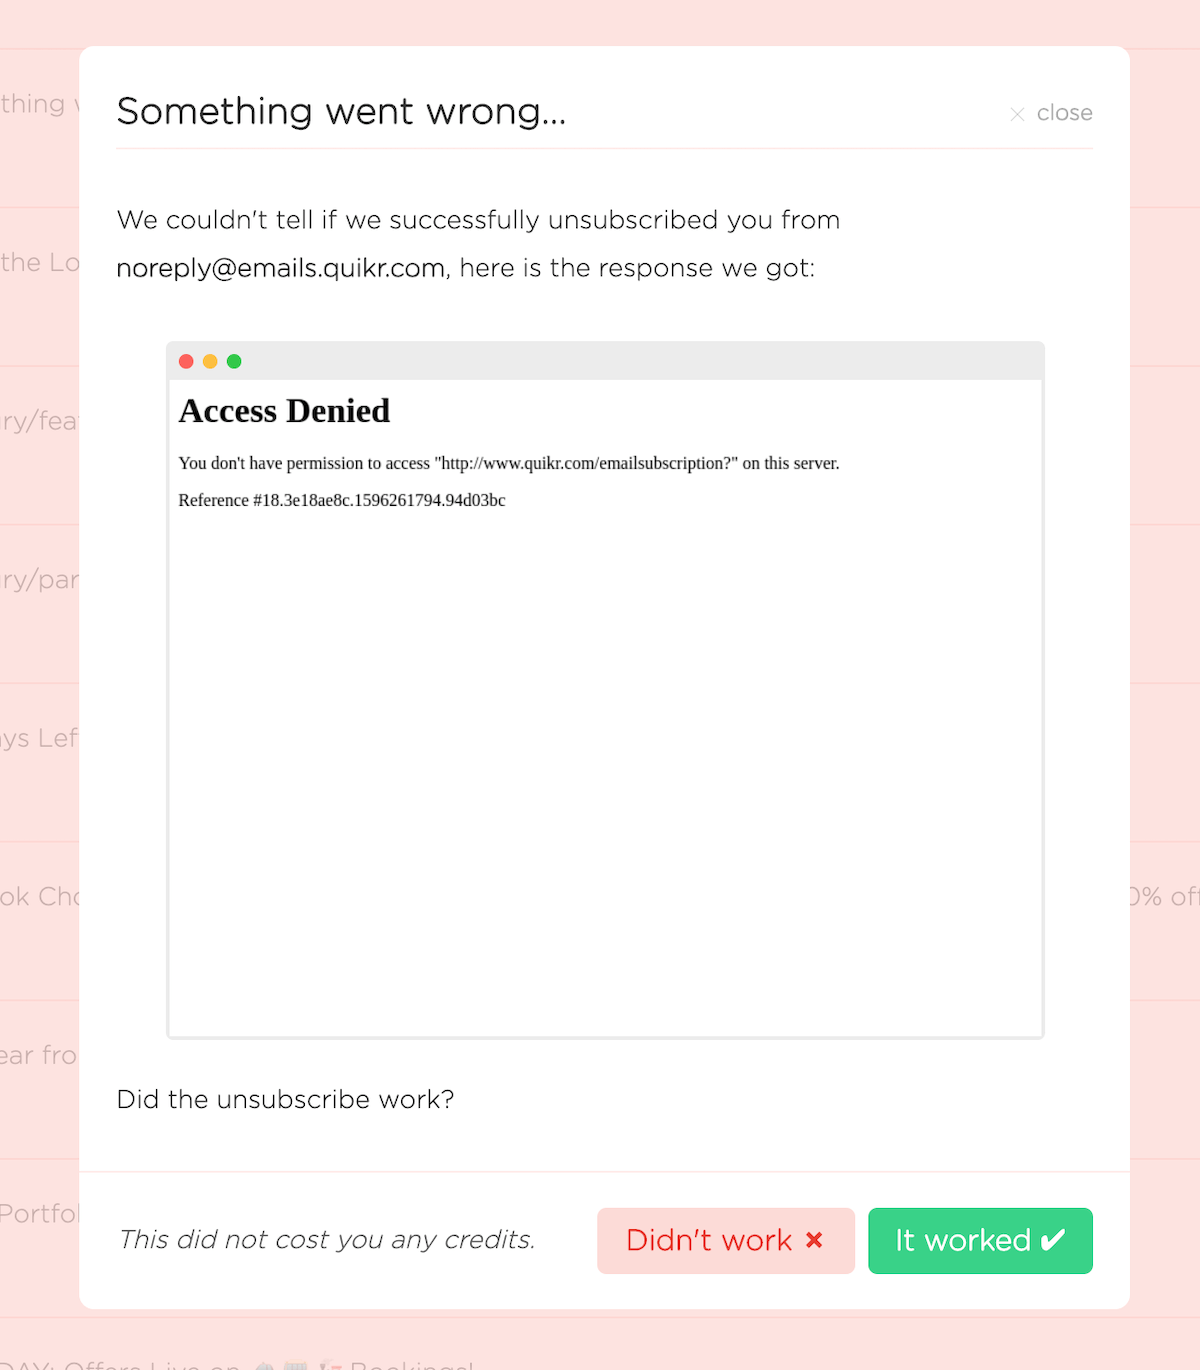
One of the caveats of this app is that sometimes, it fails to unsubscribe me from an email list.
But, when that happens, I get an option to opt-out manually, like this:

The best part of this feature is that it doesn’t cost money to unsubscribe manually.
To understand the concept better, here’s a primer on LeaveMeAlone’s pricing model:
You pay a certain amount of one-time fee to buy some unsubscribing credits.
For each email you unsubscribe, the app deducts a credit from your account if it was able to remove you from the mailing list.
In cases where you have to opt-out manually, the app won’t charge you a credit. It’s on the house.
Pretty neat, right?
I use HEY email, so all the emails you saw above, don’t even make it to my inbox because I had already screened them out.
However, if you use Gmail, Outlook, Fastmail, etc. this service can help you get rid of the clutter with ease.
Now, another roadblock that you might hit while opting out is this:
The unsubscribe link on the email is a dead end.
I’ve had encountered this situation a couple of times, mostly with promotional emails from companies.
Also:
Sometimes, the unsubscribe link works, but you’ll still end up getting spammed with emails.
To deal with these exceptional cases, here’s what you can do:
Add a filtering rule to drop emails from persistent senders
Almost every email service in the market provides a way to create filtering rules.
If you’re using HEY email, you can take advantage of the screening feature.
Similarly, here’s how you can create a filtering rule in Gmail which will automatically delete all incoming emails from a specific email address.
To create a filter for your Gmail inbox, click on the drop-down arrow on the search bar:
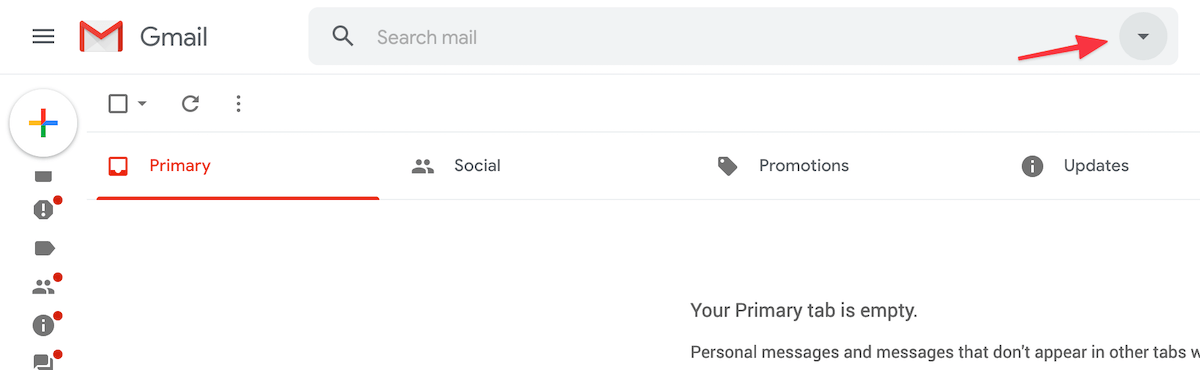
Clicking on the drop-down arrow will open up an options panel, where you can type in a “From” address to create a filter, like this:
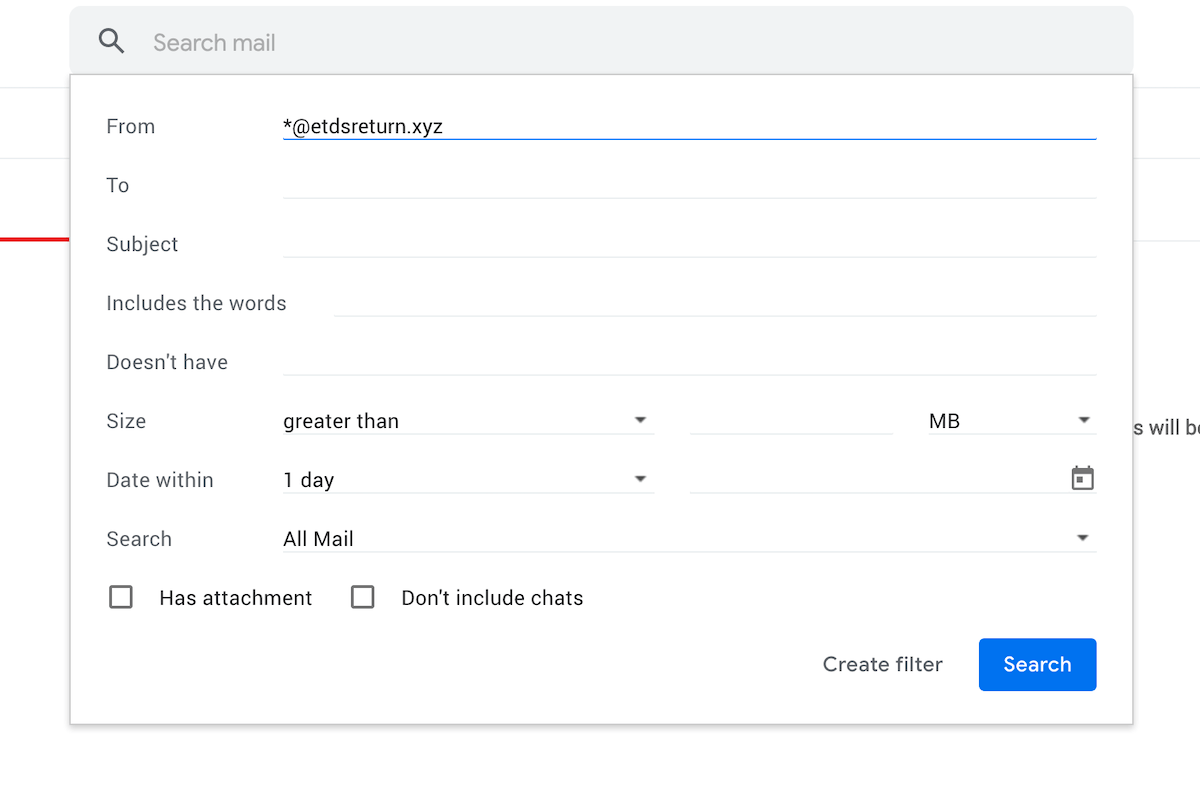
Here, I’ve added the from address as *@etdsreturn.xyz instead of the exact match info@etdsreturn.xyz.
This is because I want to filter out all incoming messages sent from etdsreturns.xyz.
I find this technique helpful because a lot of services start spamming from a separate email address when one address gets flagged.
Using a wildcard match like the one above will ensure the filter works for such situations.
Once you hit “Create filter”, you’ll see a screen like this:
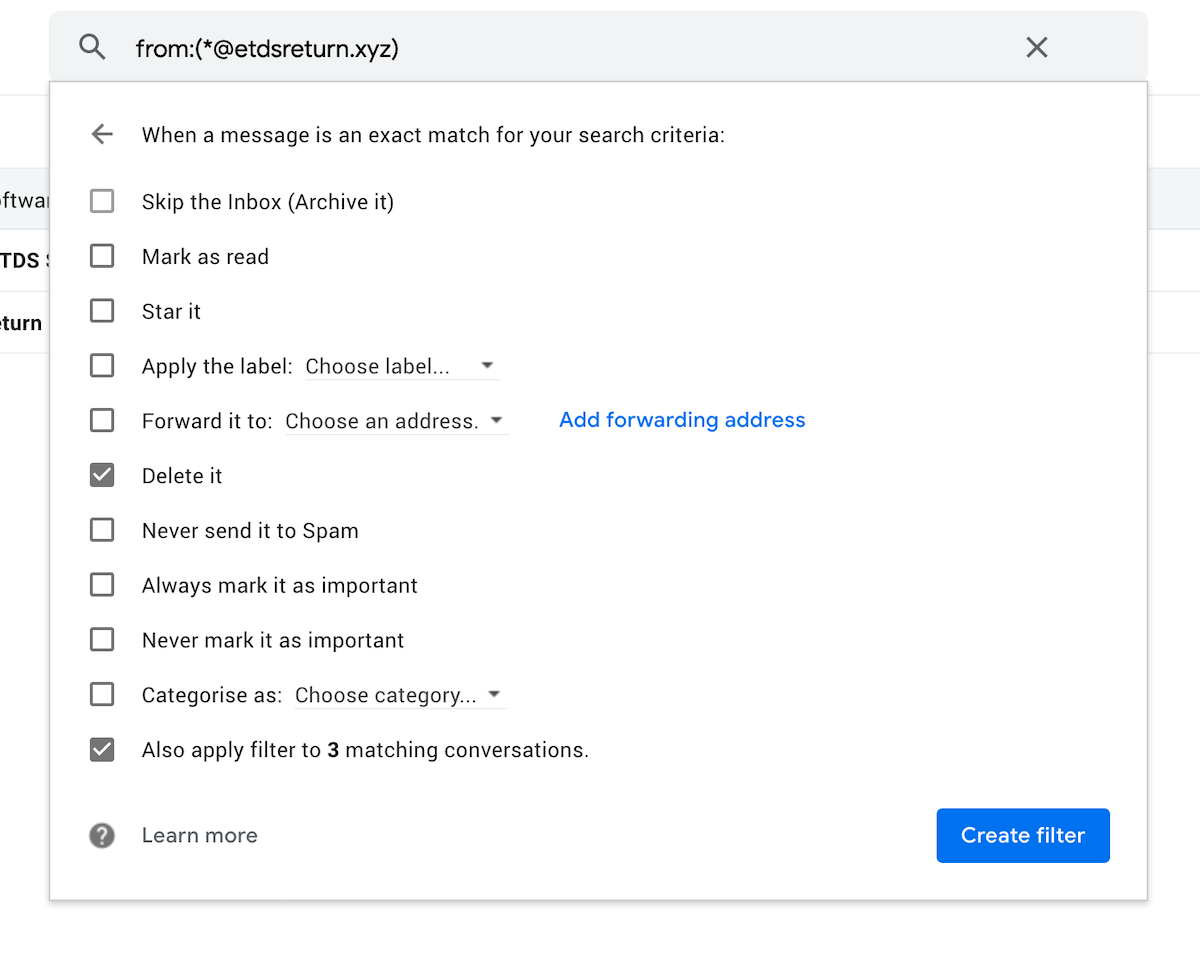
Select the “Delete it” option.
Optionally, you can select “Also apply filter to X matching conversations” to delete any previous emails from the email address you’ve specified.
Finally, hit “Create filter” and you’re done. All new emails from <anything>@thespammydomain.com will automatically be deleted before you see them.
If you don’t use Gmail, here are some guides to create a filter in other major email services:
Now:
The techniques demonstrated above will reduce the number of newsletters or promotional emails you receive on your inbox.
However, if you want to keep newsletters separate from your email, there’s a way to:
Decouple newsletters from your email inbox
Nowadays, it’s possible to receive newsletters in specialised inboxes with the help of apps like Stoop and Mailbrew.
Here’s is how it works:
- Signup for an account on Stoop or Mailbrew.
- You’ll get a personalised email address — for example username@inbox.mailbrew.com or username@stoopinbox.com.
- Whenever you want to subscribe to a newsletter, use the email address you got in Step 2.
Now, whenever someone sends their newsletter, you’ll receive it inside the app rather than your actual email inbox.
How this helps is by keeping your email inbox free from regular newsletters, and gives you a dedicated reading space for updates from the creators you love.
Stoop started with mobile apps, but they now have a functioning web app that you can use.
This is what my Stoop inbox looks like:
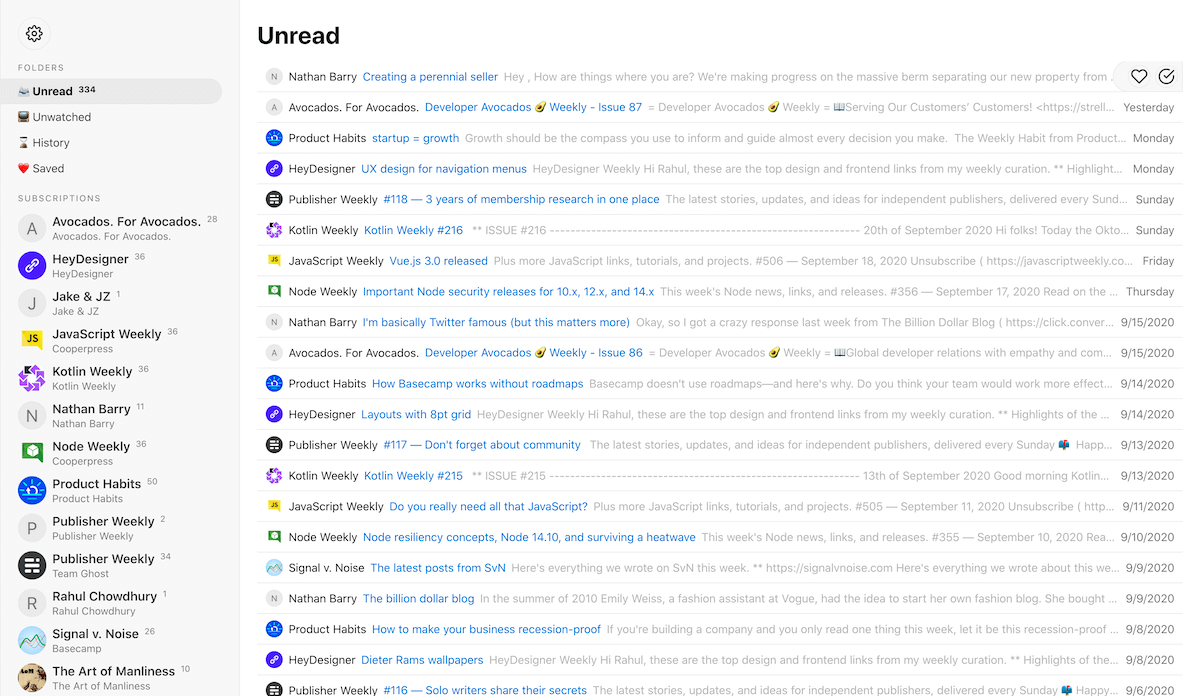
You might have noticed that there are a lot of unread newsletters in my Stoop inbox.
That is because I don’t use it anymore. I use HEY’s feed page to achieve a similar result.
However, if you’re not using HEY email, newsletter apps can be a sweet option.
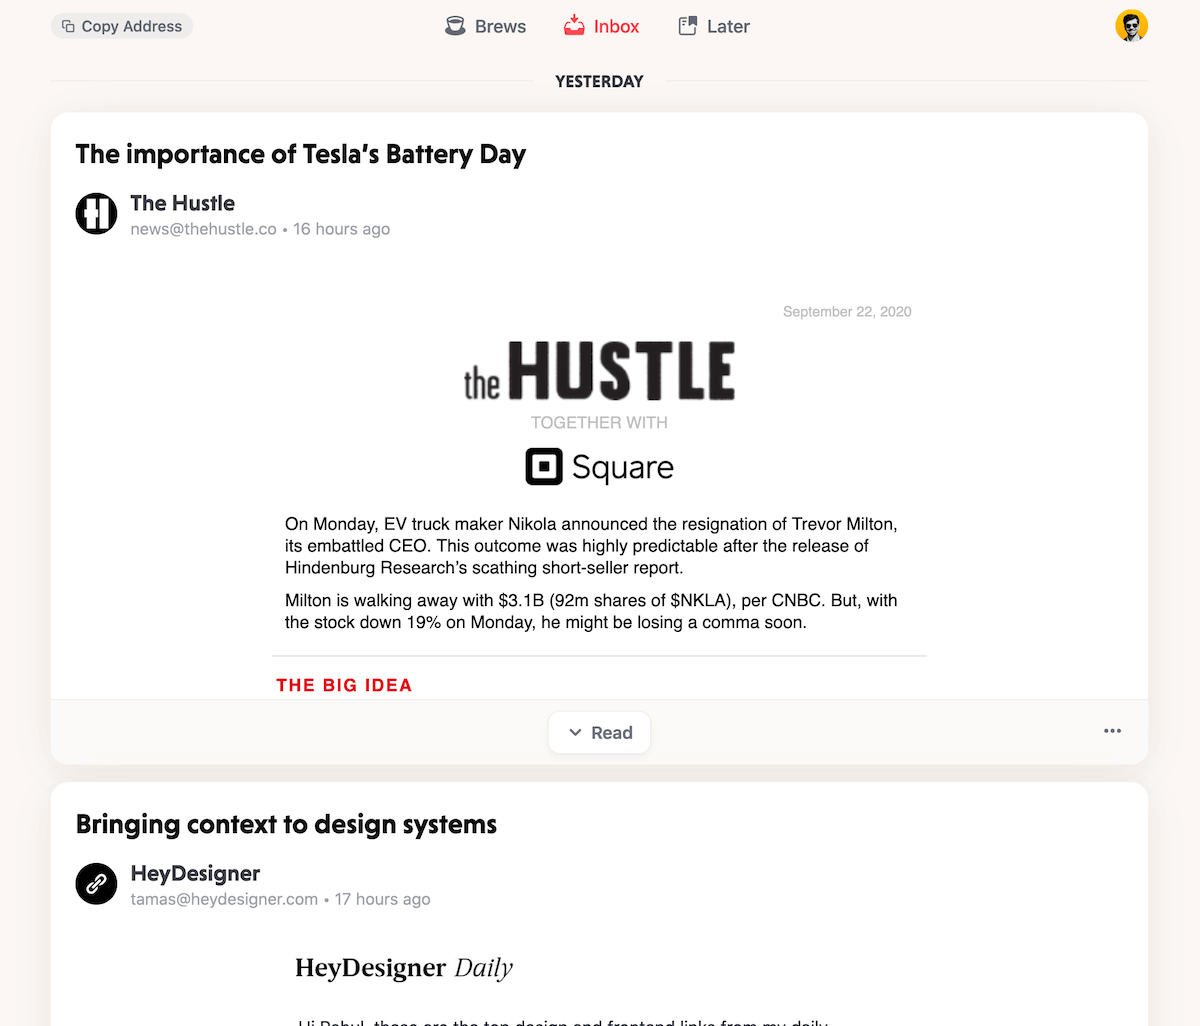
Similar to Stoop, Mailbrew offers a fully functional web app where you can receive and read newsletters of your choice.
Here’s how my Mailbrew inbox looks like:
The plus point of Mailbrew is that it’s more than just a newsletter inbox.
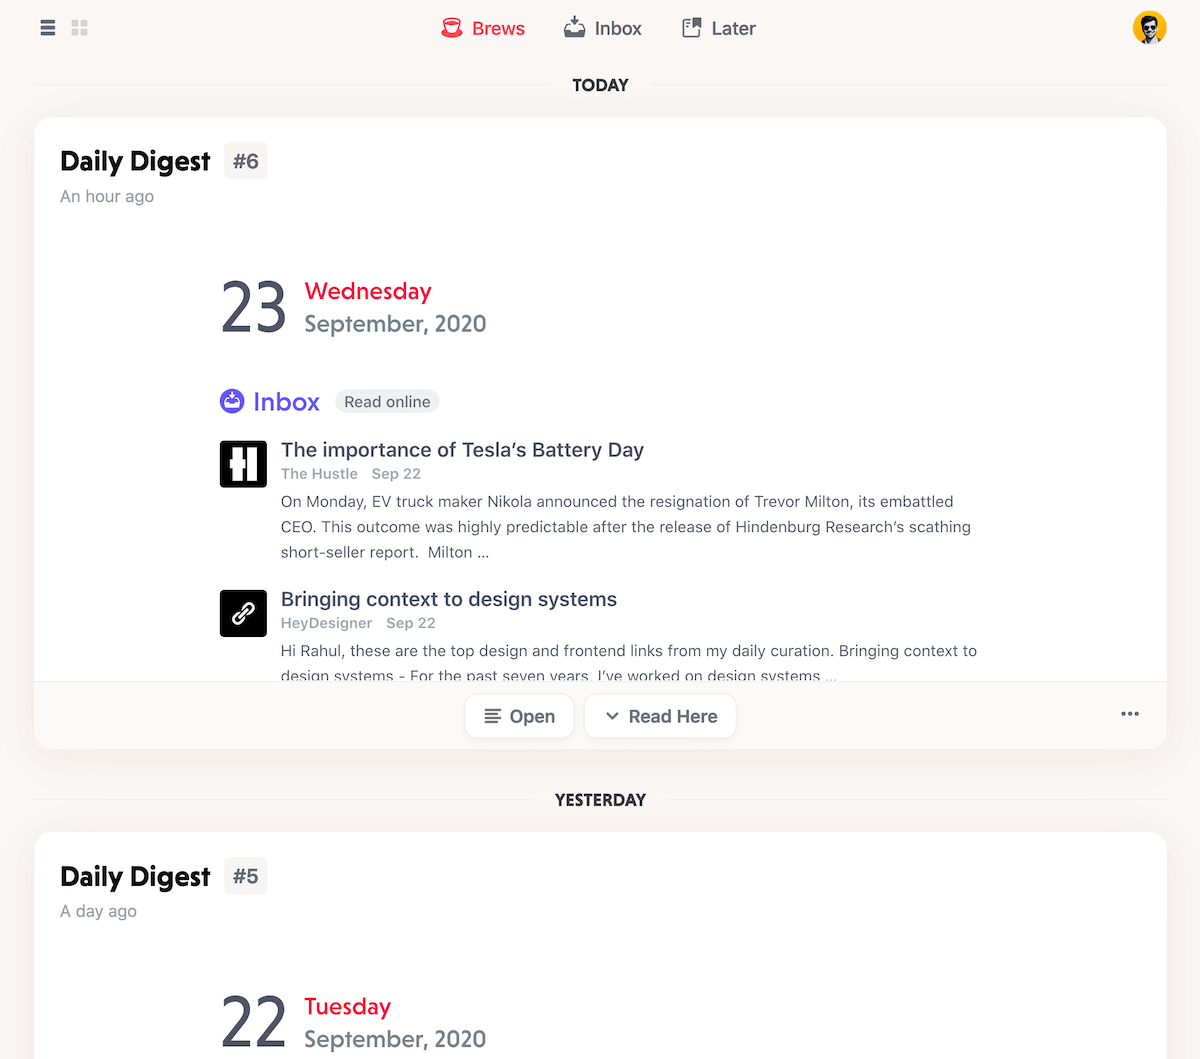
Mailbrew started with the functionality to let people create a customised daily digest by connecting various sources like Reddit, Twitter, RSS feeds, etc.
It then grew into the newsletter inbox space.
So, if you have a daily digest set up with Mailbrew, you’ll receive your subscribed newsletters as part of that digest, like this:
Now, let’s talk about pricing:
Stoop is a freemium app, while Mailbrew is paid with a two weeks trial period.
If you solely need an app to be your newsletter inbox, Stoop can be the right choice.
However, if you want to receive a single email every day with a digest of all your connected sources, and newsletters, Mailbrew ticks the boxes.
One thing to note, though:
Mailbrew doesn’t have a mobile app, yet.
So, if that’s a deal-breaker for you, go with Stoop.
Now, no matter whatever technique you use from this article, your inbox will still grow out of hand if you don’t:
Form a habit to clean up the irrelevant
Newsletters can sometimes be tempting. The landing pages are designed for conversion.
And sometimes, newsletters don’t live up to or deviate from what they pitched to you when you put down your email address.
So, here’s a two-step process to keep your newsletter list healthy and relevant:
- Only subscribe to newsletters which are relevant to you. No matter how lucrative a newsletter might seem on the subscription page, if it’s not going to be useful for you, there’s no reason to subscribe.
- Regularly prune your newsletter list. Whenever a newsletter starts to become useless to you, unsubscribe.
Talking about useful newsletters, have you tried the Hulry newsletter, yet?
If you haven’t, you can subscribe by putting down your actual or Stoop/Mailbrew address below.
Try it out for a few weeks, and if what I send every week becomes boring or no longer useful to you, feel free to unsubscribe.
I won’t ask you for your DNA sample, or slap a notice saying “Your email will be removed from our systems in 7 days”.
It’s just a single click, and you’ll be unsubscribed.


