

 In-depth articles, series and guides

If you have been following this blog, you will know that I love organising things.
Sometimes a little too much, yes, but this tiny habit has paid me hefty dividends over the years.
So, in this blog post, I'll share all the ways I declutter my digital files and workspace and how you can do the same in easy, practical ways.
Before we get started, this post is long because we'll be covering many areas of our digital lives. But you can work on each area independently, and you can bookmark this article to return to each section as and when you're ready for it.
You don't have to tackle every area at once. Pick the area that you feel needs your attention right away, work on that first, and then move on to another area later.
One step at a time.
With a plan in hand, let's start with the first source of clutter for almost everyone:
Browser Tabs
Like everyone else, I accumulate a generous number of browser tabs while browsing the web for research or casual day-to-day activities.
And over time, the tab bar becomes so cluttered that it's hard to locate any individual tab without playing hide-and-seek with the entire list:
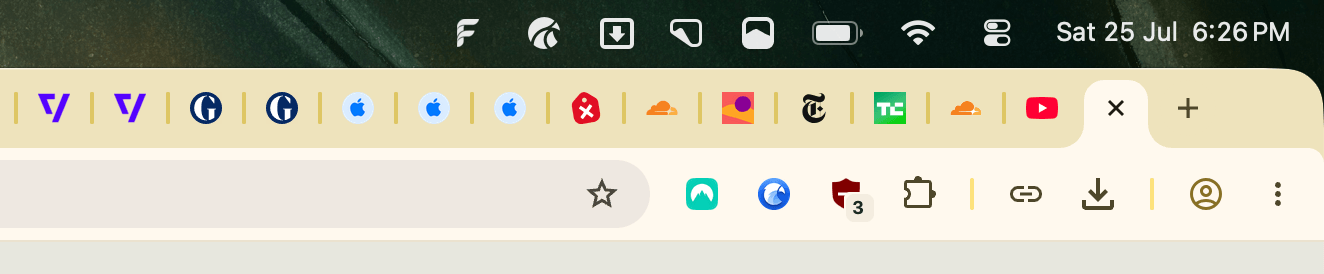
Now, I know I can lay out tabs vertically, which is an option on every major browser at this point. And while this tab presentation is a bit better than laying them out horizontally, the list can still get cluttered quickly:
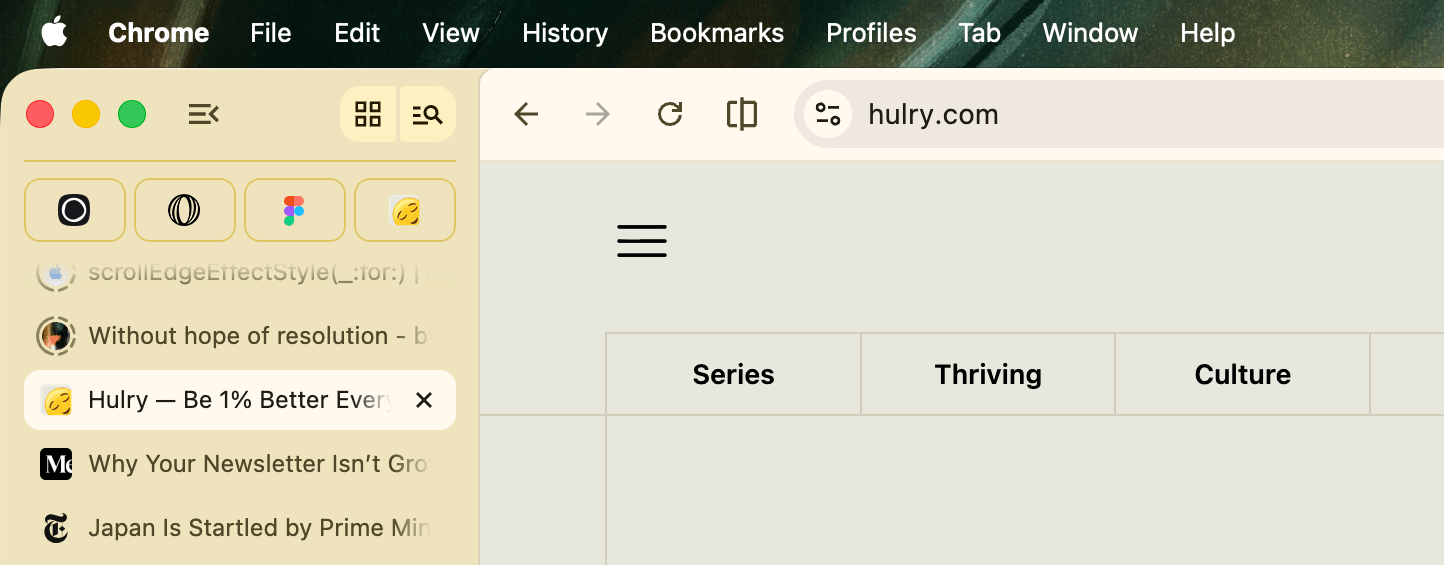
So my approach to handling excessive opened tabs is this:
Not every tab needs my attention or action right away. As I open tabs I want to revisit later, I save the tab's URL to my to-do list app using the browser's share option:
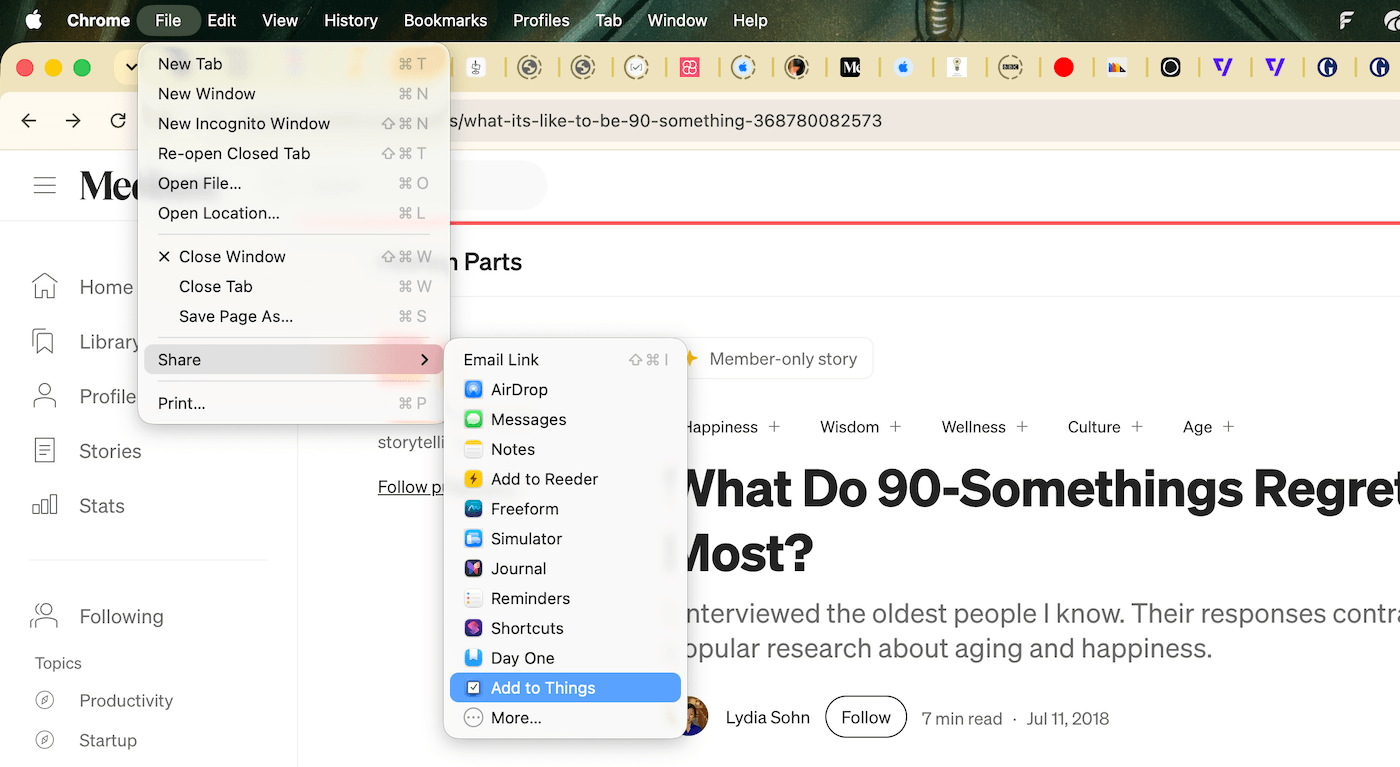
I use Things 3 as my to-do list cum catch-all place to save random items for later, and Things has a dedicated tray for this called Inbox:
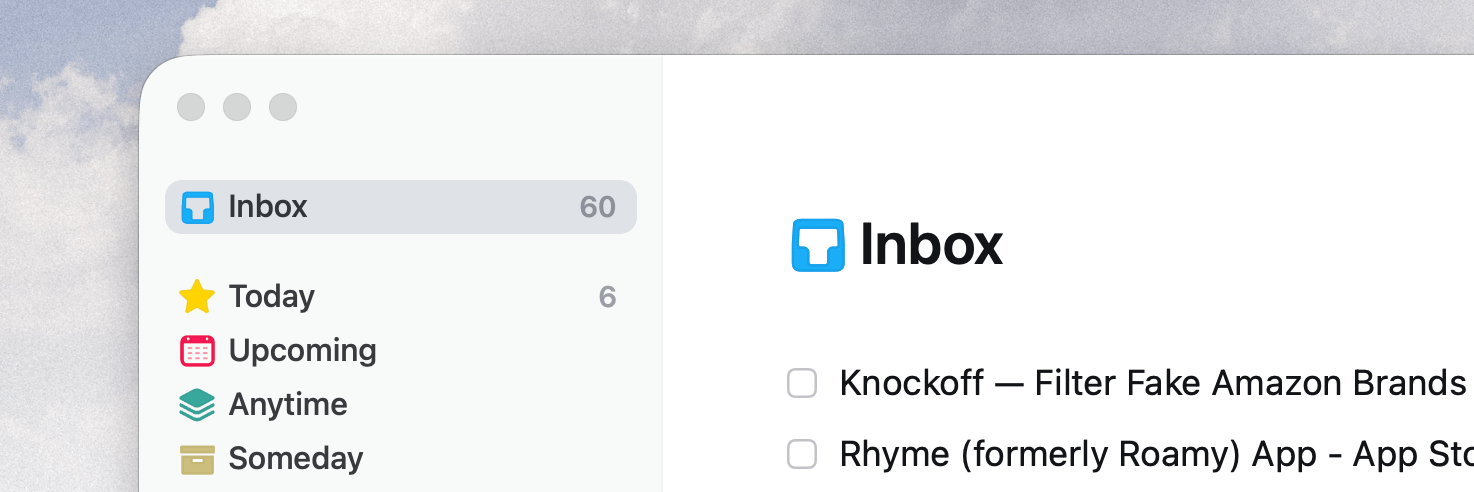
Todoist and TickTick have one, too. And if you use Reminders, you can easily set one up.
Therefore, most items I save are in this Inbox list. However, there are cases where I directly sort items to specific lists.
For example, if I am saving an app that I want to review for the newsletter, or a generic resource, I usually add them to my Things Inbox.
But say I come across a potential sponsor for the newsletter. I have a dedicated list called Sponsorship for these leads.
This segregation is helpful because I can directly reach for the dedicated list when I'm emailing sponsors instead of sifting through my saved items in the Inbox, which is usually a long list.
Things has a Quick Entry feature, which pops up an entry box with the current tab URL and title autofilled on pressing ⌃⌥Space:
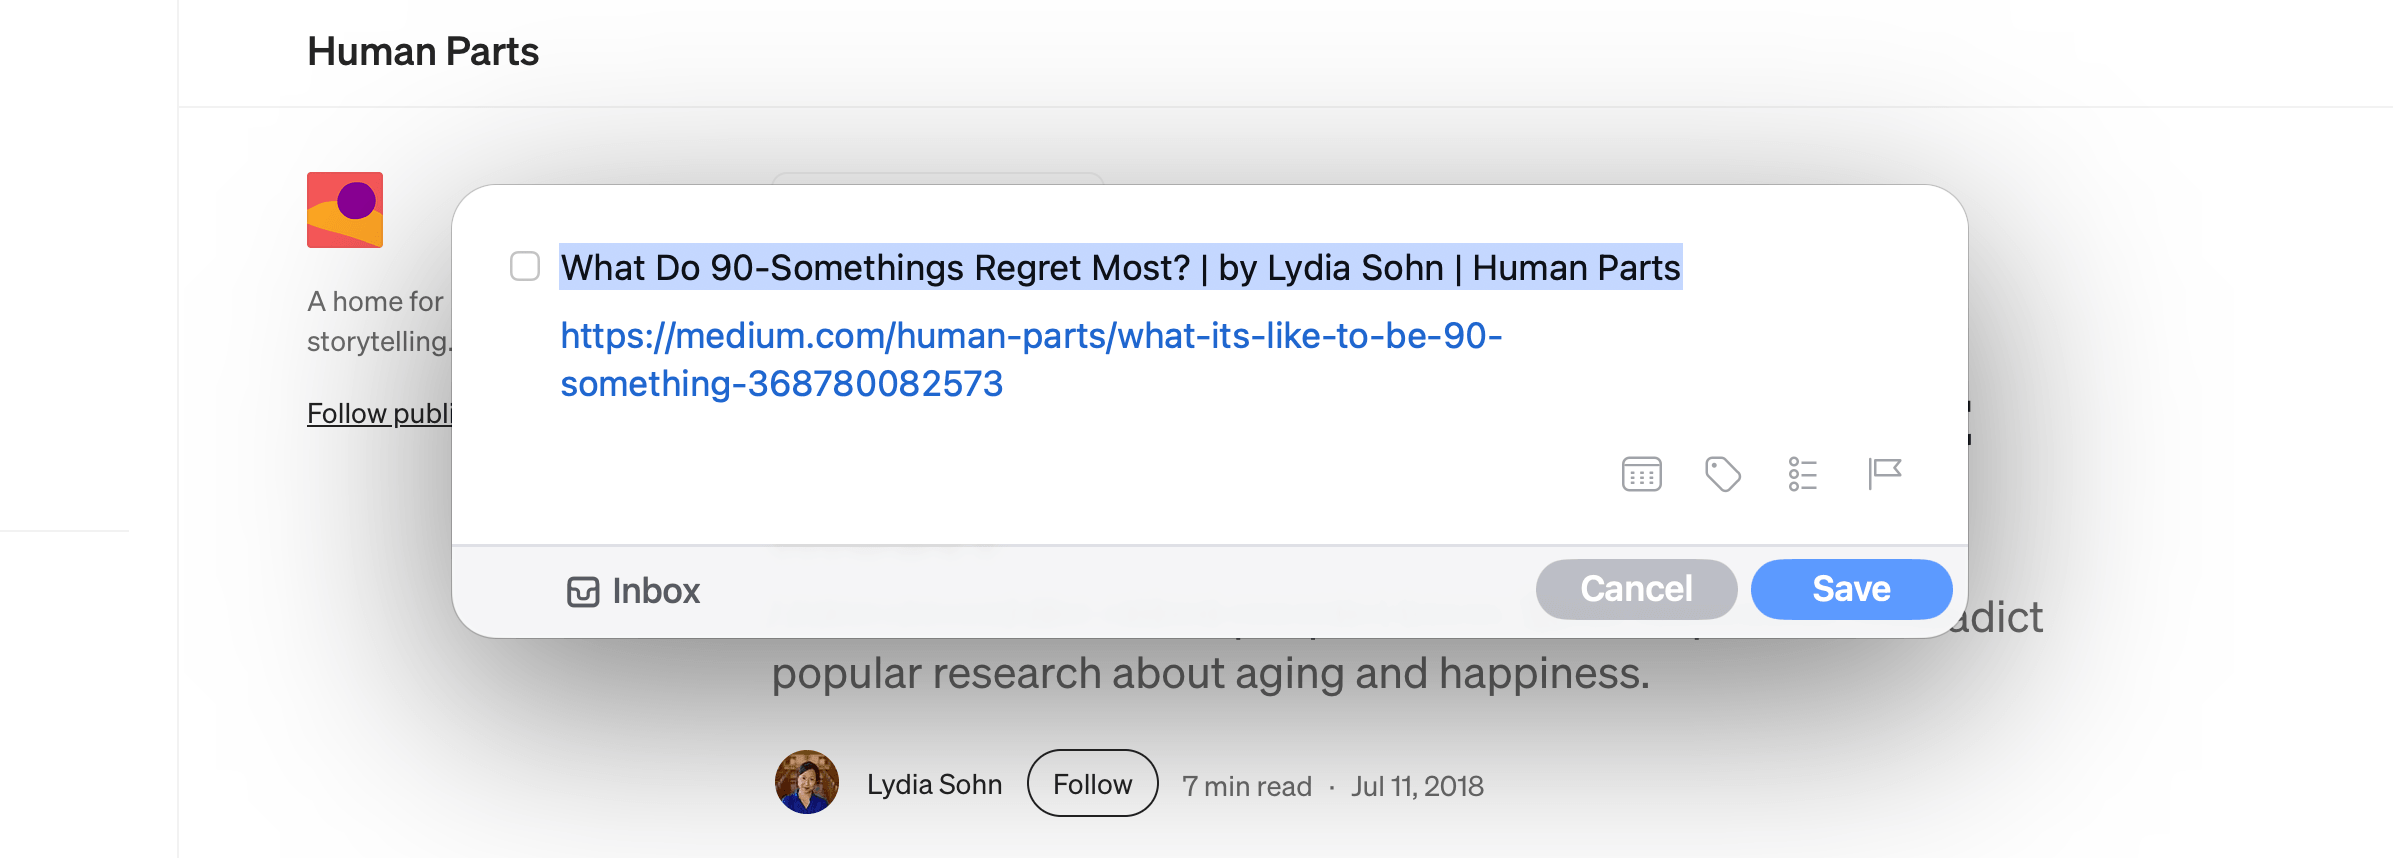
I use this to save pages to my Things Inbox quickly.
Now, for articles that I want to read later, it's a slightly different story.
Instead of saving each article in a to-do app, the RSS reader app I use, Reeder, allows saving articles for later, and I save these articles there through the browser's share options:
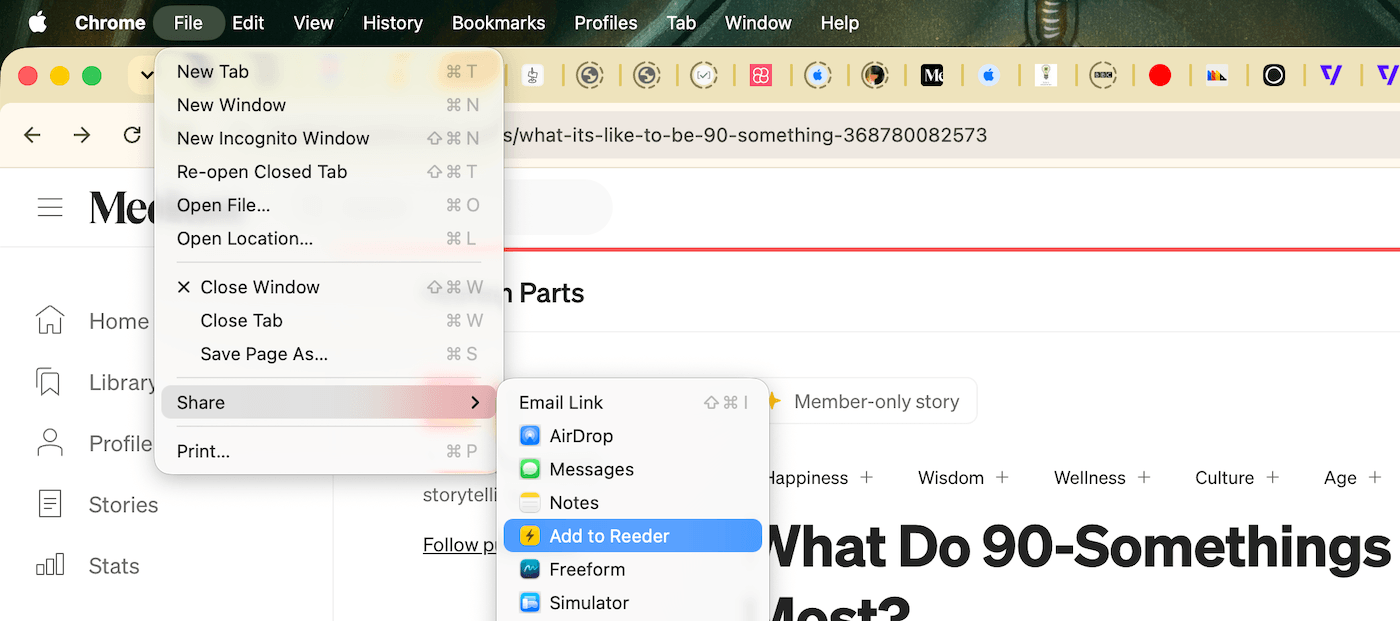
With this approach, I keep a minimum set of tabs open at any time because I have already saved non-urgent tabs for later in their dedicated spaces.
But sometimes I'll land on short-lived links. For example, I might be intermittently reading a page or trying an app, and have a few open tabs that I'll return to in a few hours or in a day or two.
Saving these links in my to-do app and reopening from there is an unnecessary overhead.
Instead, I've created a tab group called Inbox in the browser, where I move those tabs:
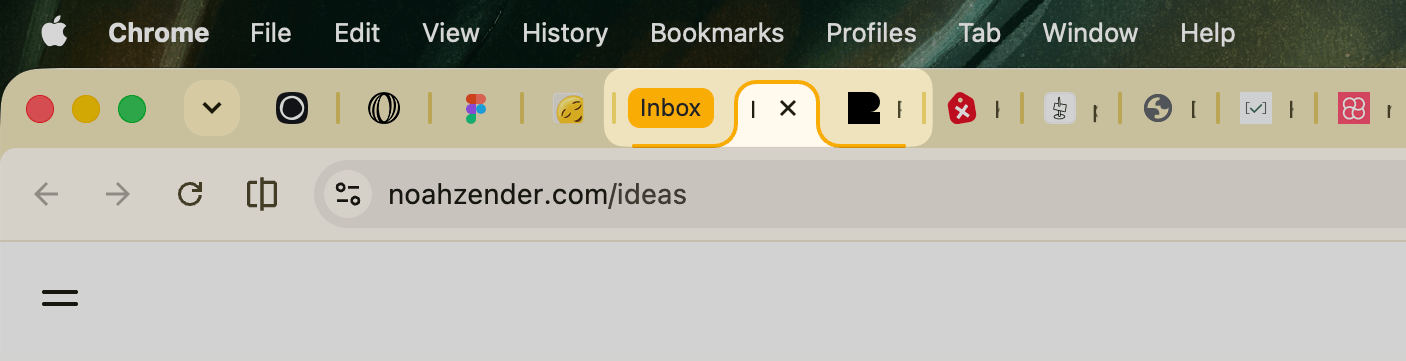
This is better because I can then collapse the tab group and keep everything clean and compact in the tabs view without cluttering up the entire space.
Another use case for this is when I'm researching something. If I'm researching, then I'm bound to collect plenty of tabs around that topic. To keep things neat, I create a tab group for the research topic and then add relevant tabs into that tab group.
Now, tucking away tabs like this helps us clean up our workspace, but the process is useless if we don't review the saved items later.
So I occasionally go through the Things Inbox folder and review everything that I have saved there. And I do the same for the tab groups currently open in the browser.
This keeps things moving and doesn't move the problem of a cluttered workspace from the browser to a to-do list or a read-it-later app.
Now, another area which often becomes cluttered rapidly is our:
Email Inbox
We receive emails from everyone and everywhere nowadays.
And as we regularly sign up for apps, newsletters and services with our email, our inboxes can get cluttered pretty quickly.
It's especially annoying when we receive marketing spam from an app or service we signed up to receive important communication.
Now, some email apps, such as Gmail, can apply intelligent sorting to automatically organise emails into groups and keep our primary inbox space clear.
But there are a few problems with this approach:
- We have less control over how our emails get sorted, and important emails often land in the wrong group and therefore escape our sight.
- The emails stay unread and unprocessed in the inbox, which is an eyesore to me.
Therefore, I rely on automated filtering rules to do the job instead.
This approach has other perks, too. For example, if I am switching to a different client app, such as the Mail app on macOS or iOS, my existing filtering rules stay in effect and new emails still get sorted according to the rules I've set.
This is how they work:
For frequent senders such as newsletters or transaction emails from shopping sites, banks and other places, I have created two labels called Newsletters and Papertrail.
Then I created filters in Gmail to label, archive and mark emails from specific vendors as read.
For example, Gmail allows creating unlimited email aliases by appending extra text to our email addresses via the + symbol.
This means that emails to both rc@hulry.com and rc+newsletter@hulry.com will be delivered to the same inbox.
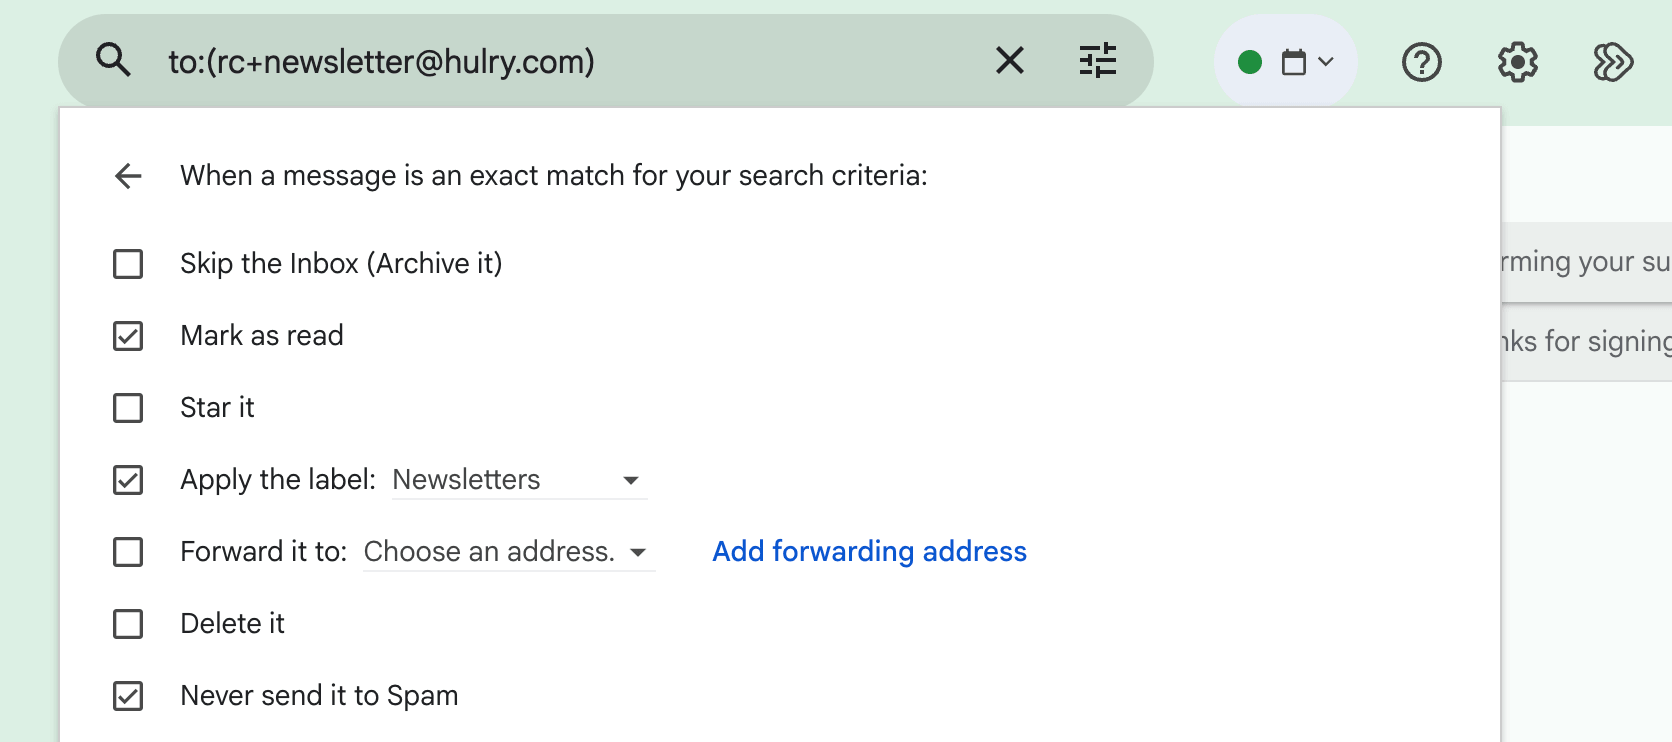
So, when I subscribe to newsletters, I use a preset plus address.
And on Gmail, I've created a filter rule where any email that lands on this particular address gets auto-tagged with the Newsletters label, marked as read and is never sent to the Spam folder:
This ensures that newsletters still arrive in my email inbox, but stay in a muted, non-attention-grabbing state:
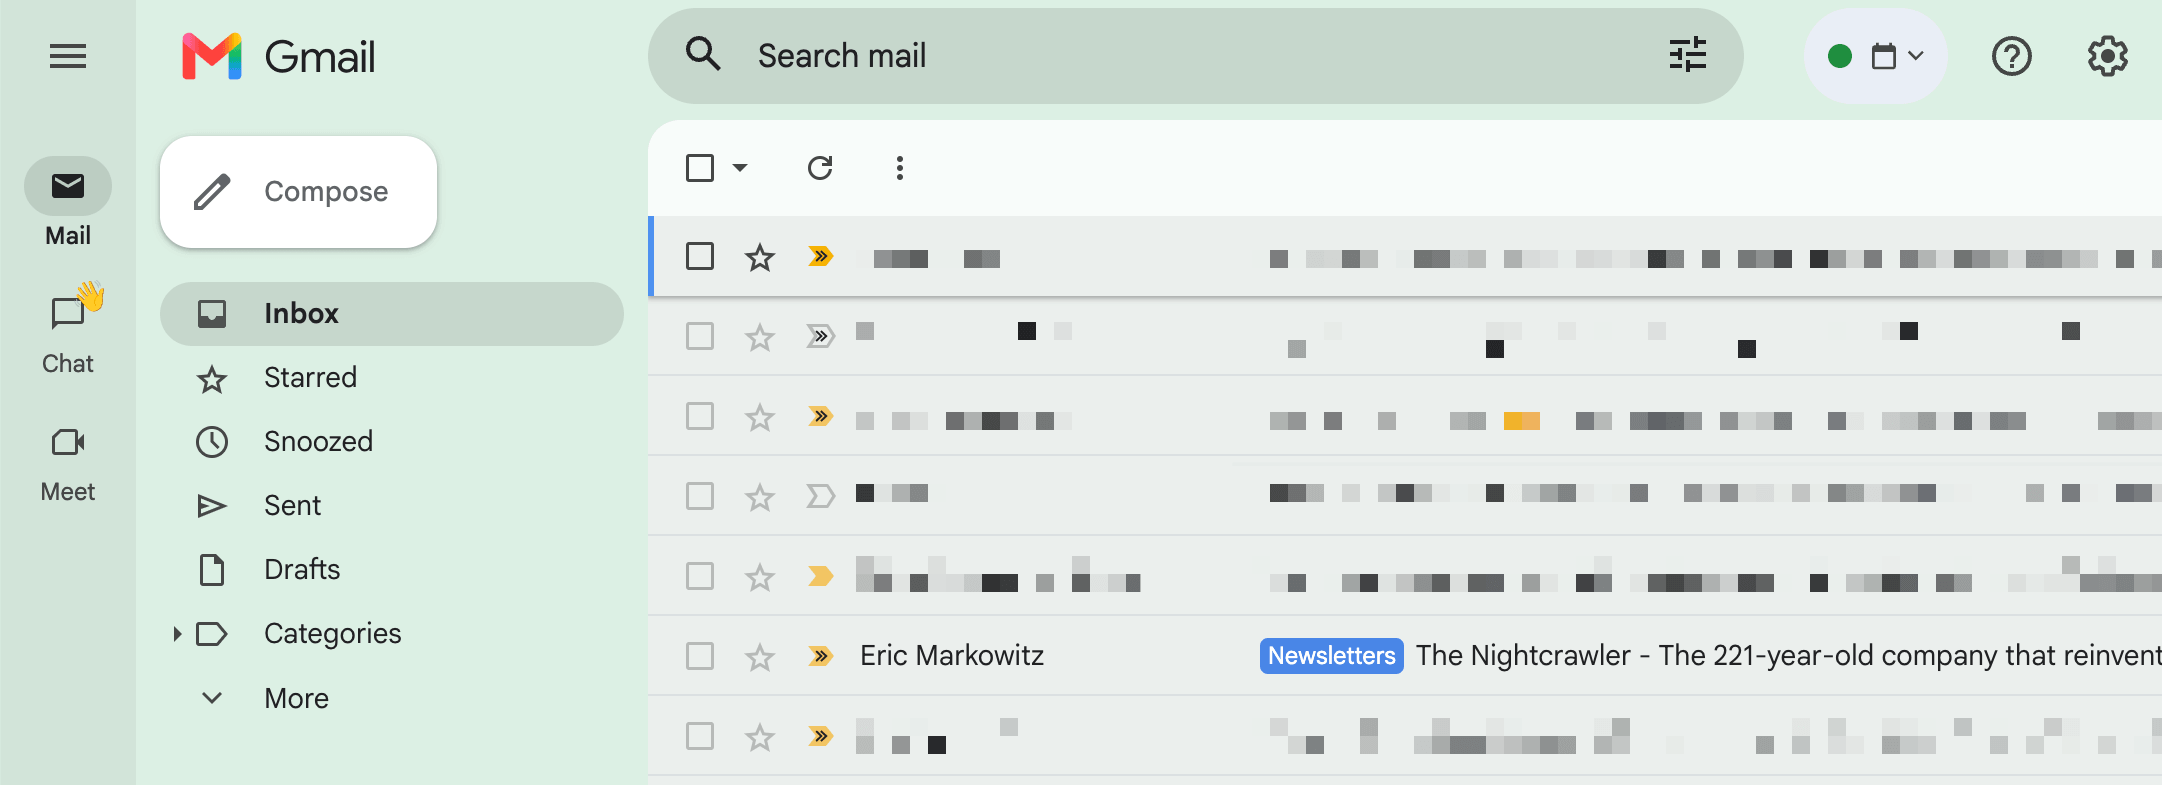
When I have the time, I read and delete or archive the newsletter emails, keeping my inbox clean.
Now, while this keeps the newsletters I enjoy neatly organised, a newsletter I don't read anymore but still arrives in my inbox every day or week is clutter.
To ensure my subscriptions stay lean and meaningful, I regularly unsubscribe from newsletters I don't enjoy anymore.
There are a few ways to do this:
First, you can regularly unsubscribe from newsletters you don't find useful while reading one of their issues:

Second, if you already have plenty of subscriptions that are no longer relevant, search for the term “unsubscribe” to surface all mailing list emails you have in your inbox:
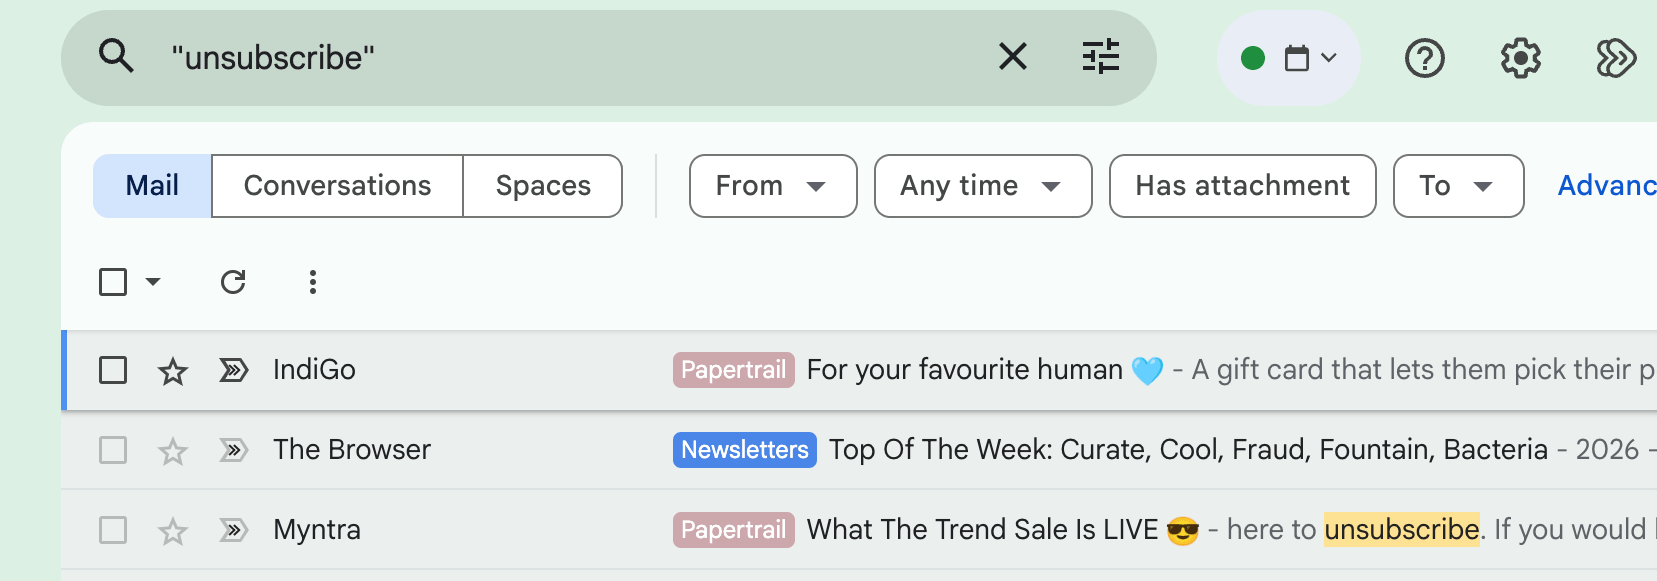
This will give you a bird's-eye view of your subscriptions, and you can unsubscribe from the newsletters you don't like.
But if you use Gmail, the app has a neat view for this purpose.
Open Gmail and click the More option in the sidebar to reveal all options:
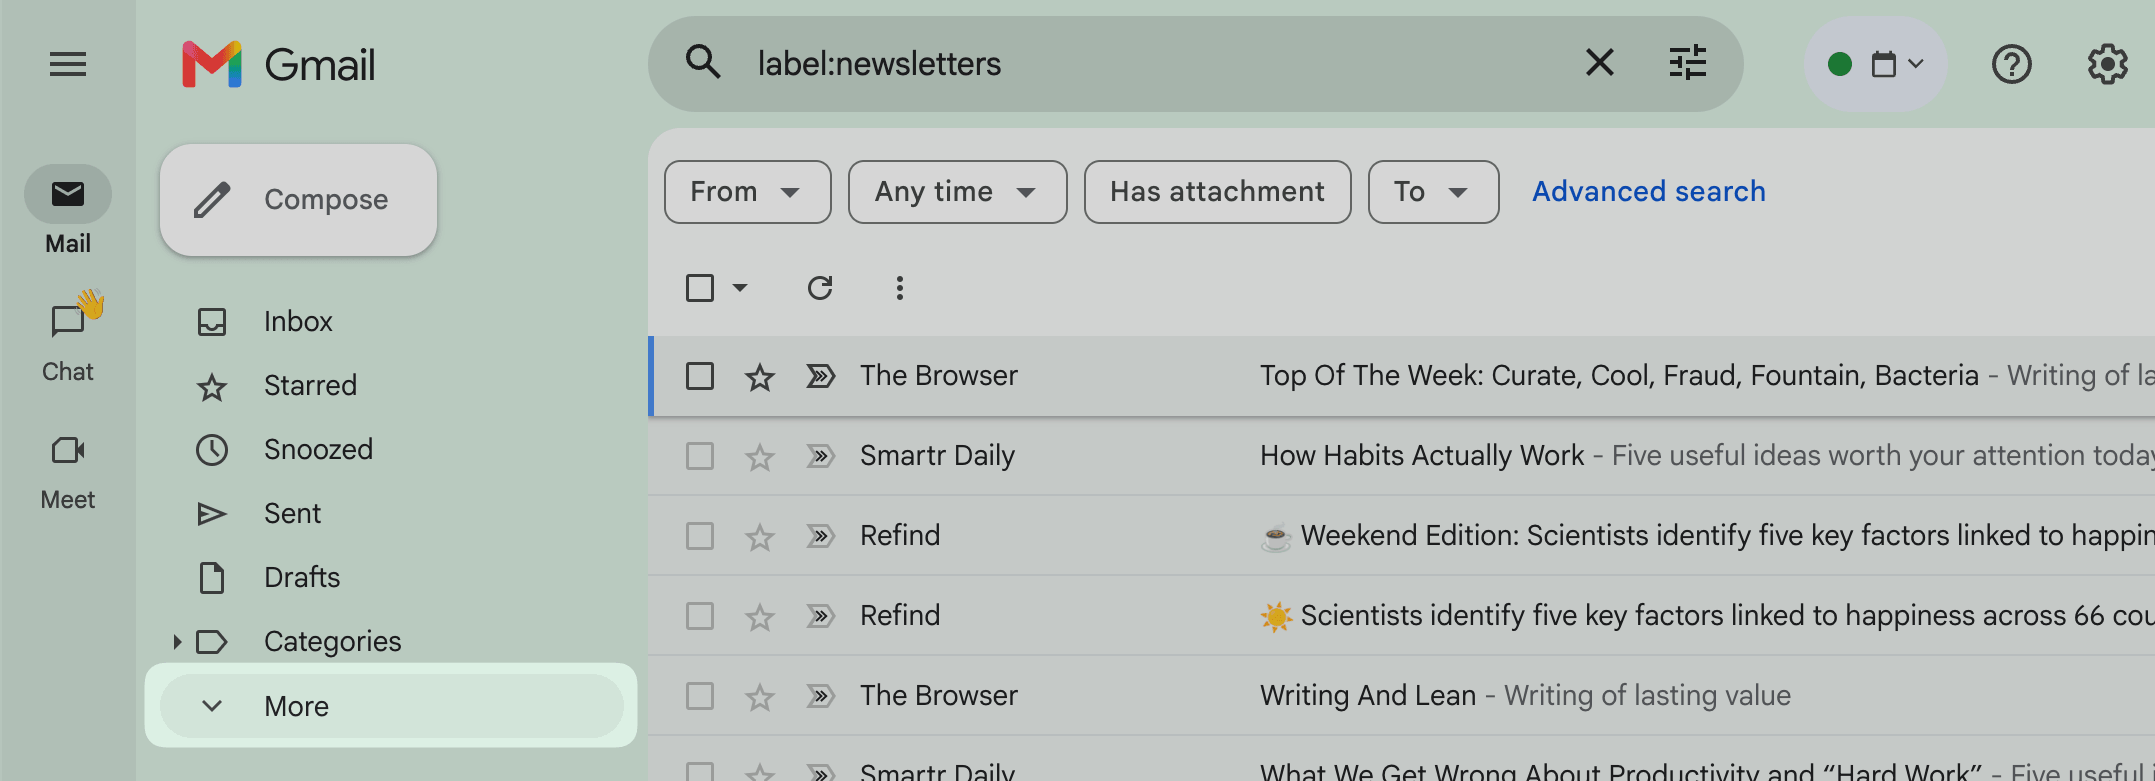
Then, choose Manage subscriptions to open a subscriptions dashboard like this:
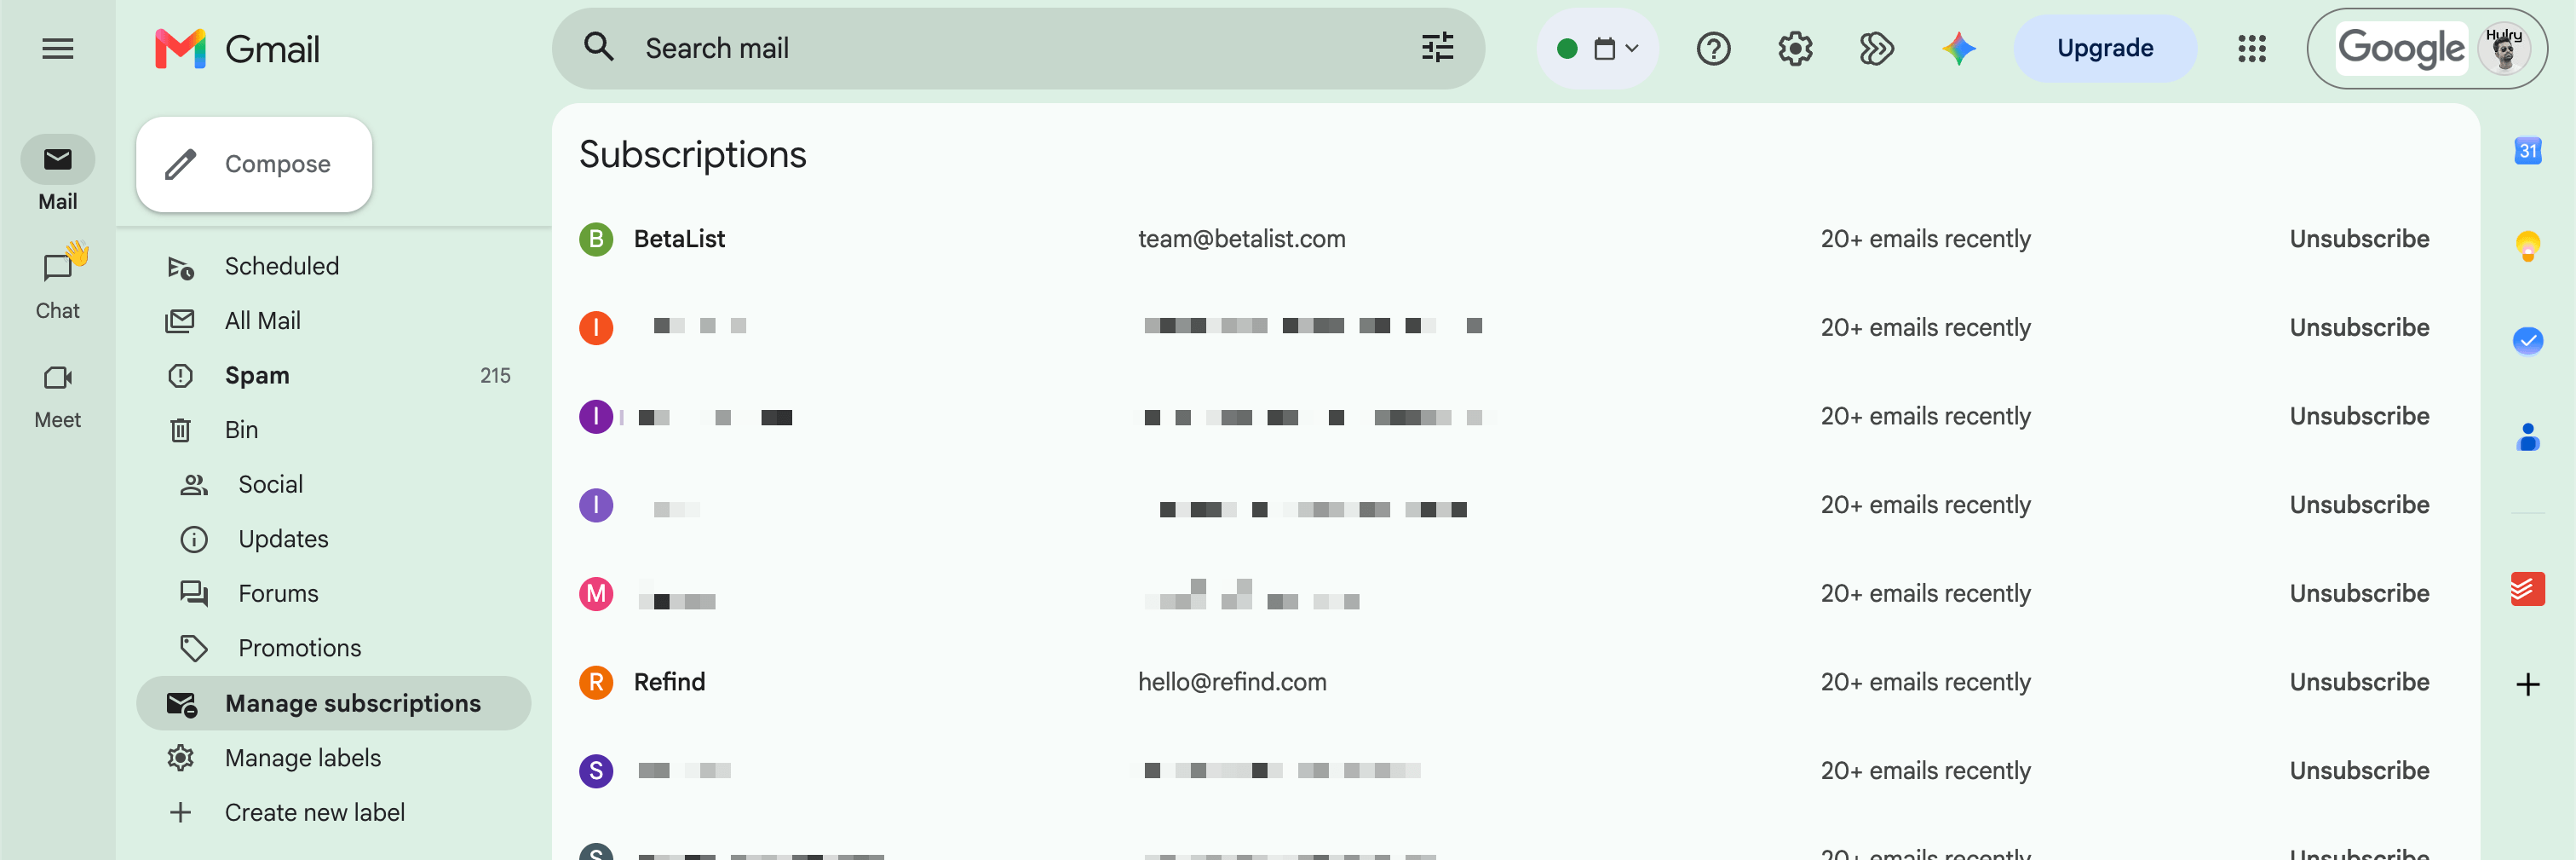
Here, you can quickly unsubscribe to newsletters you don't need using the Unsubscribe button beside each sender.
Okay, with newsletters handled, you can use the same plus address technique to sign up for apps and services, but I've noticed that some apps don't allow signing up when the email address has special characters.
Instead, I use my actual personal email address for apps, bank accounts and services and then filter the incoming emails by the sender's domain.
Here's how it works:
For example, I have a filter that catches all emails that arrive from the domain @amazon.in and then marks those emails as read, archives them, tags them with the Papertrail label, and ensures that they are never sent to the Spam folder:
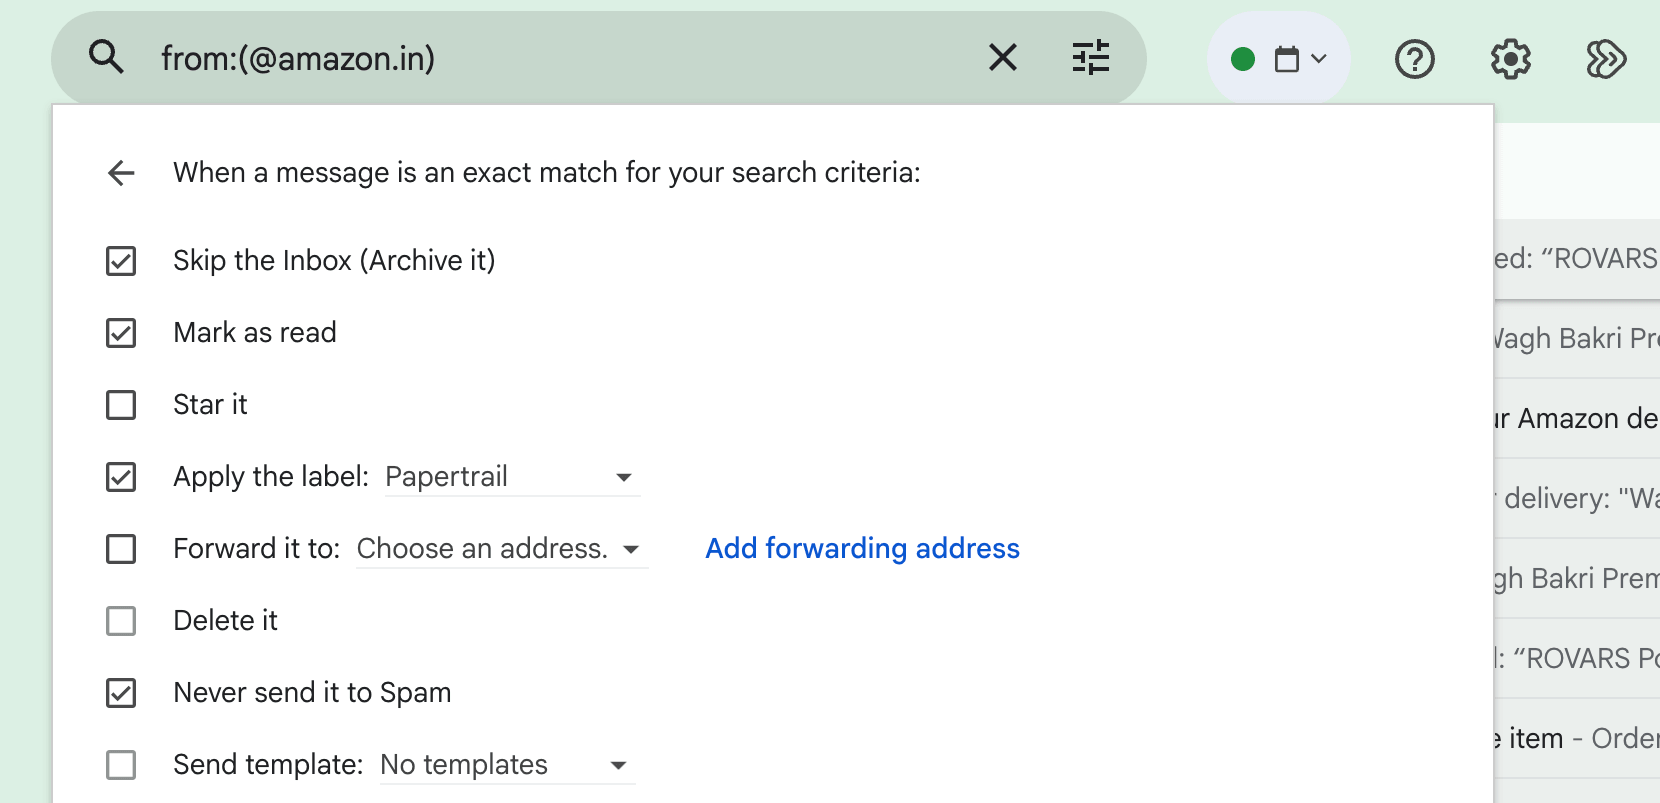
It took a while to get all vendors converted into rules individually, but these rules are future-proof.
Since I have filtered them by their domains, even if the vendor changes their sending email address for marketing or any transactional emails, they are still captured by my premade filter rules and are automatically sorted.
When I sign up for a new service that I start getting emails frequently from, I create a new filter rule for it.
With all these filter rules in effect, my email inbox remains relatively quiet and usually only contains emails that I want to receive in my inbox.
Now, while creating a filter in Gmail, you'll notice a checkbox at the end labelled Also apply filter to matching conversations:
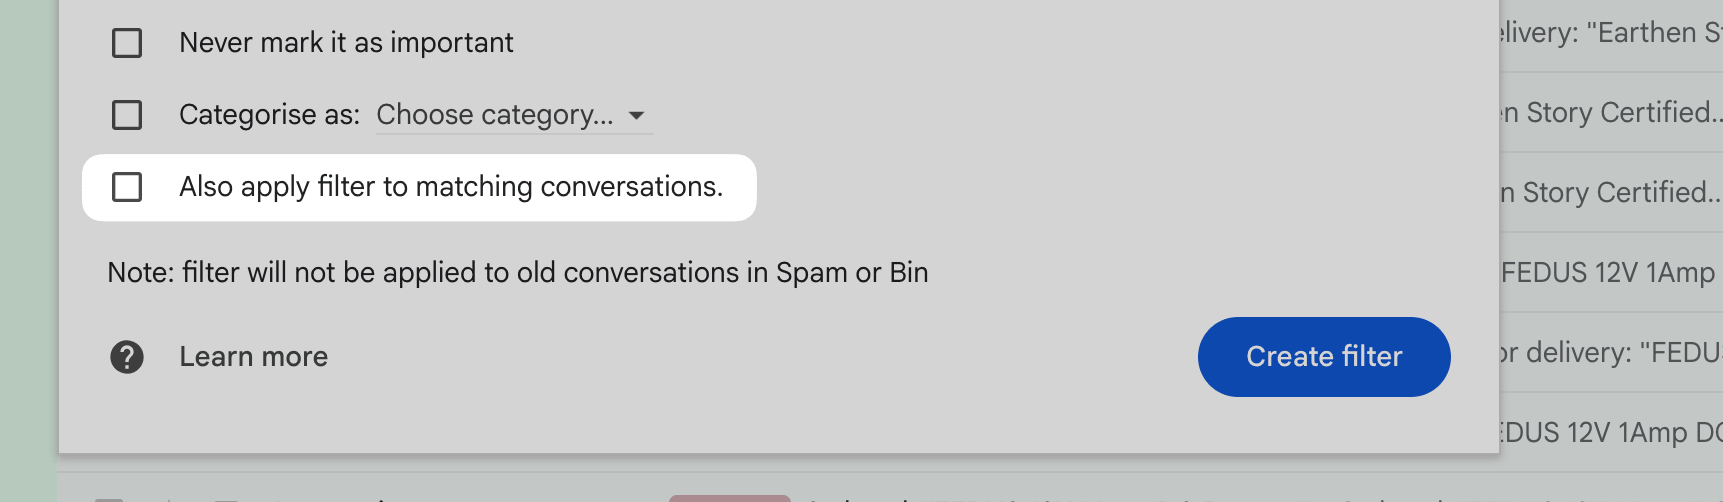
This is incredibly helpful, because if you have a cluttered inbox, you can match existing emails using a new filter rule and organise them in bulk.
Therefore, by creating a few of these filters, you can move and sort thousands of existing emails and have an inbox that's much easier to work with.
Most email providers, such as Outlook, Fastmail and Proton Mail, allow creating filters like the ones above, so you should be able to recreate this workflow for your inbox.
Now, while this works for most of the genuine emails that we want to receive, we can put up an extra barricade for emails we don't want cluttering our primary inbox.
For example, you might sign up on an e-commerce site to get an introductory discount code and then get blasted with a series of emails that you never agreed to.
This was a significant problem for me as I frequently sign up for new apps to try and recommend in the Hulry newsletter. Since I won't be seriously using most of what I try, if I start receiving regular emails from these app companies, either marketing emails or app updates, they make the inbox unmanageable.
To handle this, I use a separate, throwaway Gmail address to sign up for apps and discount codes, which I only open when I need to sign in somewhere or copy a discount code.
This way, my primary inbox, the one that I do check regularly, stays clean and I don't have to worry about creating unnecessary filter rules for these sorts of services.
This approach is different from using a masked email, such as the ones provided by iCloud's Hide My Email service, because a masked email still routes emails to your primary inbox, and therefore doesn't solve the problem.
With emails out of the way, let's move on to the next source of clutter:
Screenshots
Screenshots have become a norm in our daily digital operations and rapidly clutter our workspace. And by default, screenshots are saved in the places where we work the most.
For example, on a Mac, screenshots are saved to the Desktop. On an iPhone, they're saved in the camera roll along with regular photos.
So, how do we deal with this mess?
While I didn't stop taking screenshots, I tweaked some settings to change how they were saved on my laptop.
I use the CleanShot X app on my Mac to capture screenshots, and it allows changing where screenshots are saved:
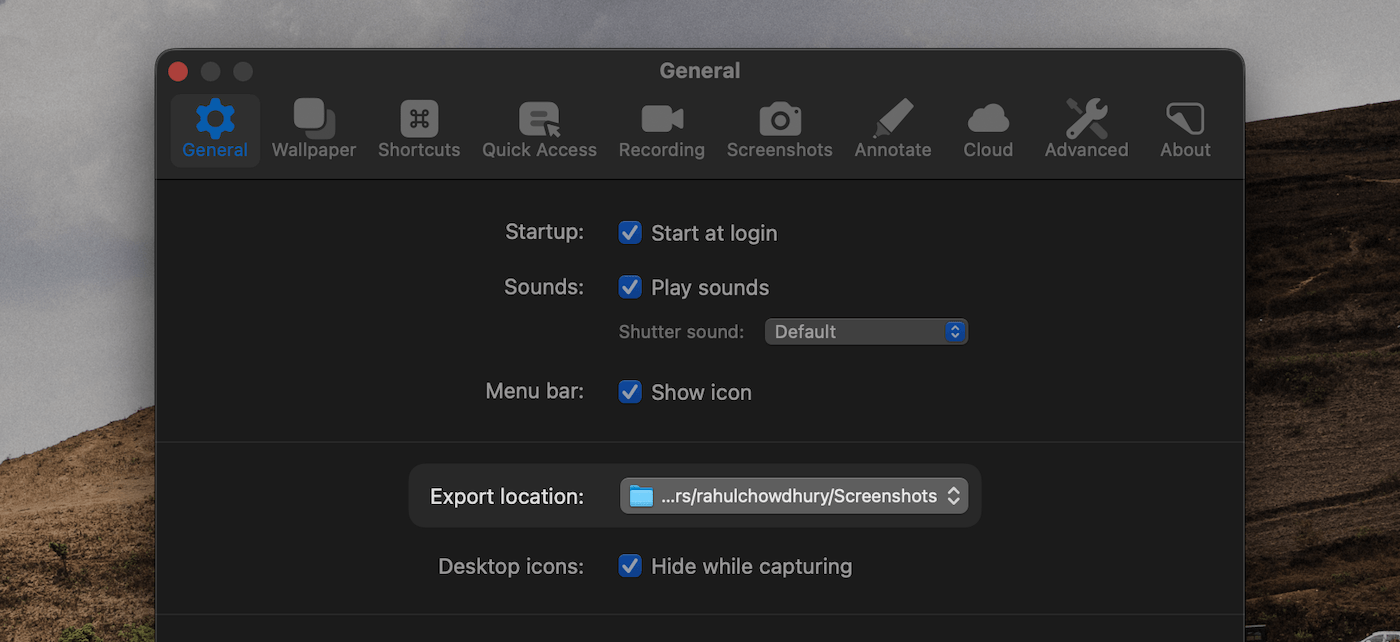
So I created a new folder called Screenshots, and I tweaked CleanShot X settings to save all future screenshots to this new folder instead of saving them in the Desktop folder.
This ensures my Mac's desktop remains clean and doesn't get cluttered with screenshot files.
Even if you don't use a third-party app for screenshots on macOS, the default screenshot utility also allows changing where your screenshots are saved.
You can press ⌘ Shift 5 to open up the system screenshot toolbar, and choose the screenshot destination to a folder other than the Desktop folder.
Now, iOS doesn't allow saving screenshots to a location other than the camera roll.
But the Photos app has a media type called Screenshots in the Collections tab that helps filter all screenshots from the camera roll:
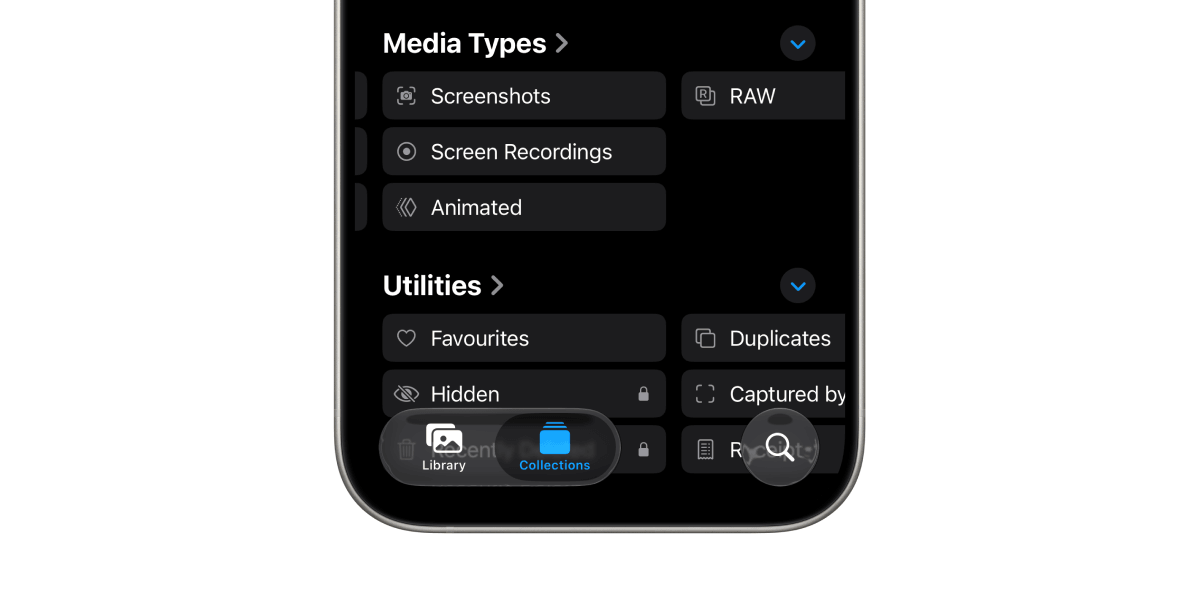
I regularly use this filter to view and delete screenshots I no longer need. This keeps the camera roll clean and browsable for photos.
I do the same thing on macOS in my Screenshots folder, where I clean up any old screenshots that I no longer need.
Now, you can use apps such as Hazel to run automations and automatically clean up screenshots older than several days, but I don't use one.
I often take screenshots of payment receipts and other stuff that I intend to use as proof for customer support should I need it, so I don't want automated rules to delete those important screenshots.
Speaking of screenshots, here's how I arrange my:
Documents and Other Files
I use a hybrid storage approach for my documents and files.
Large files such as video footage for my YouTube videos, thousands of RAW photos, purchased music, etc. get tucked away in a pair of external hard drives as archived files.
For more important and lightweight files, usually documents and frequently used assets, I keep them on iCloud because it's convenient, more reliably backed up, and available on all my devices.
Here's how I arrange these files for fast access:
I have a few top-level folders in my iCloud Drive for broad areas of life and work, such as Documents, Business, Photos, Purchased Assets, etc.
Under the Documents folder, I keep all important documents, grouped under subfolders by type, such as Identity, Banking, Insurance and Housing.
This serves as my go-to space when I need to access one of my documents, such as passport, health insurance, tax reports, etc.
The next most important folder is the Business folder, where I keep files grouped first by projects and then by purpose.
For example, under Business, I have a folder for Hulry, and inside it I have several subfolders for each corner of the project:
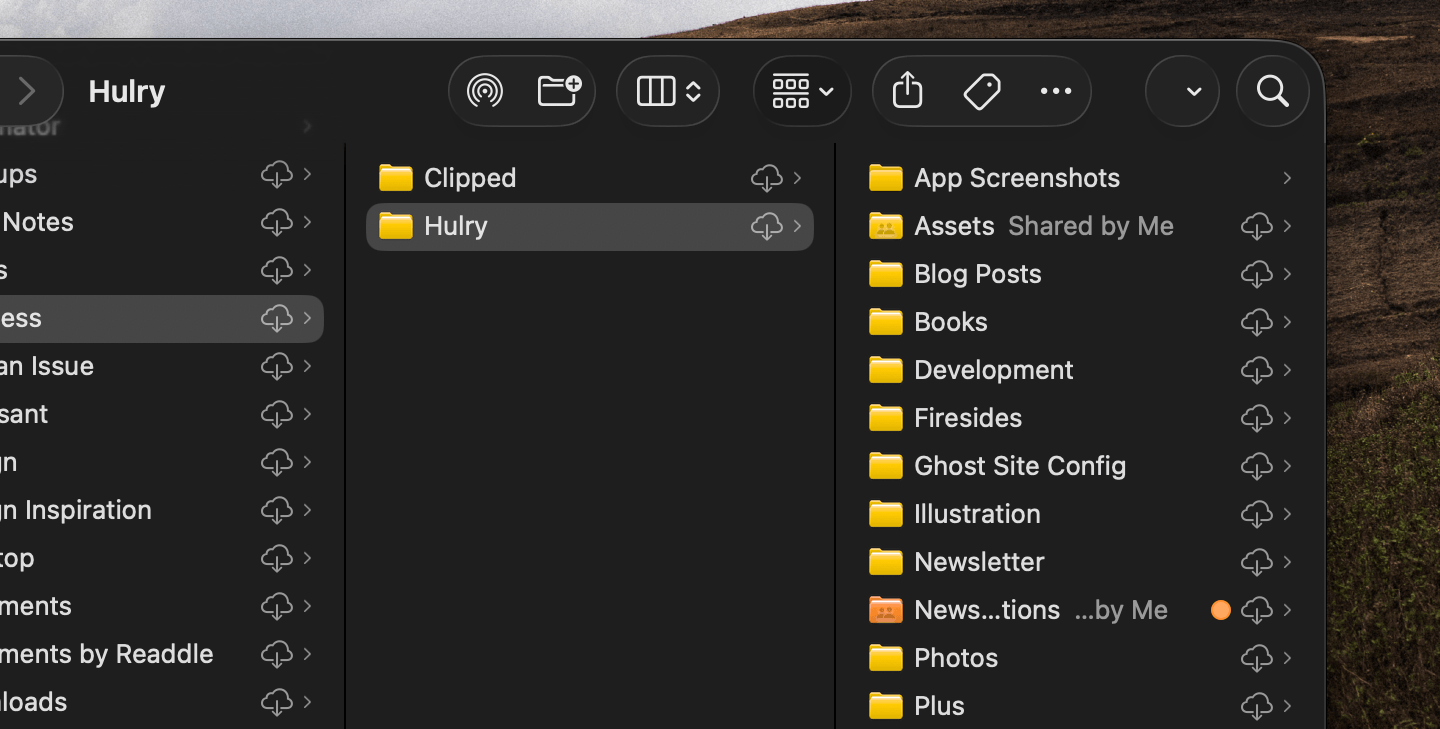
Some key folders here are Assets, Purchases, Newsletter Illustrations and Blog Posts.
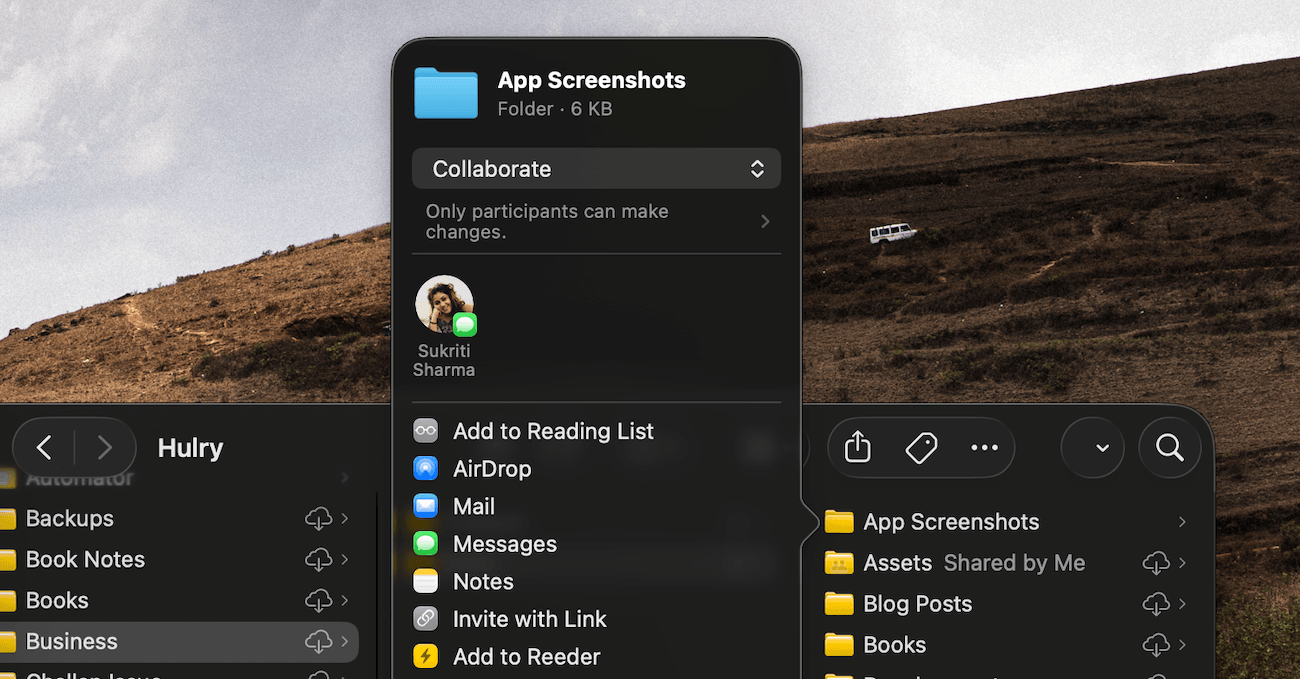
I've shared the Assets and Newsletter Illustrations folder with my wife via iCloud's folder sharing, and we collaborate on the assets and illustrations kept in this folder.
If you use iCloud, you can share an entire folder with another person using iCloud by right-clicking the folder, choosing Share and using the sharing mode as Collaborate:
The Purchases folder is where I keep all purchase receipts related to the business, which comes in handy at the end of the financial year when handing them over to my accountant for tax filing.
And the Blog Posts folder is where I keep an extra backup copy of my published blog posts, for any doomsday situations.
The filing system is quite simple and effective, and I've been using it over the last few years without any roadblocks. But if you want a more formal system to manage your files, the Johnny.Decimal system might work for you.
Now, since there are a few folders that I regularly access for work, such as the Assets and Newsletter Illustrations folders, I have created Quicklinks for these folders in Raycast.
In Raycast, you can create a Quicklink as usual and then select a folder path instead of a URL like this:
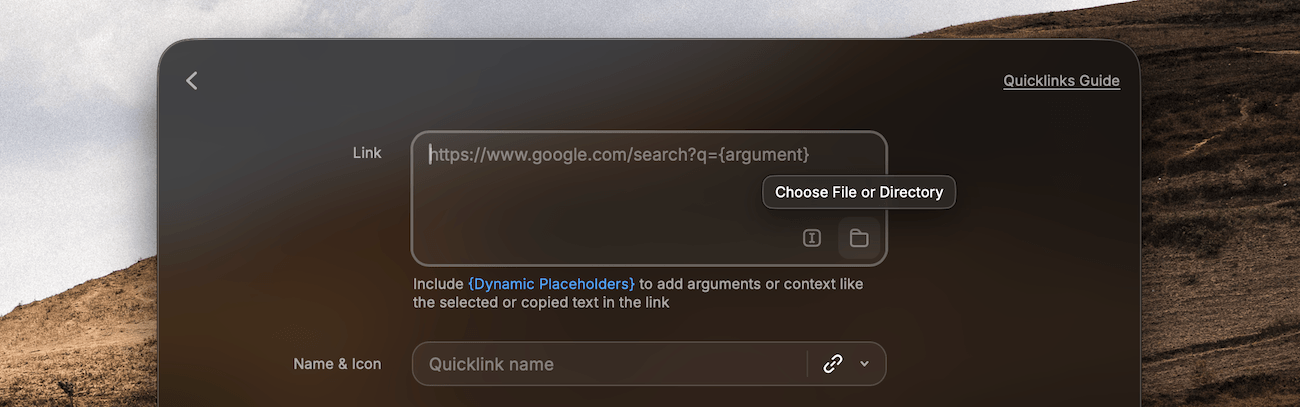
I've also set up aliases for these Quicklinks, which means I can type nws to open the Newsletter Illustrations folder from anywhere on my Mac:
If you want to learn more about my hybrid storage strategy and how I've set up the external hard drives for redundancy, I've written a detailed post about it.
For now, let's move on to one of the most overlooked areas in digital spaces:
Passwords
Like files and emails, too many passwords can be a nightmare to manage.
To circumvent this problem, many people reuse the same password in different services instead of creating a new one for each. This is not a safe practice. Companies get breached, and if one service gets compromised, every other service where we have an account with the same password becomes vulnerable to attacks.
A better option is to create separate passwords for each service, but then it becomes a hassle to remember them all.
Even with a coding system that many people use to slightly vary their passwords per service, remembering and managing hundreds of passwords can get cumbersome and messy.
This is where a password manager comes in handy, and I've been using one for the last ten years to manage my passwords.
I use an app called NordPass, but there are many other options to choose from, such as Proton Pass, 1Password or even the stock Passwords app on Apple devices.
Most password managers can securely store more than just passwords. You can store documents, software licenses, notes and other information.
For example, I save a few of my most used documents as a second copy in the password manager. This gives me another convenience point to access those documents when I need them quickly. Or copy an ID number.
Apart from storing passwords and important documents, I also extensively use my password manager to store licence keys for various apps.
Many of the apps I use, such as CleanShot X and Shakkei, use a licence key system to validate my purchase. While we don't need to punch in the licence key every time we use these apps, organising the keys comes in handy during licence renewal or when reinstalling an app.
Another area where a password manager is helpful is in storing two-factor authentication codes.
Many websites support adding two-factor authentication for enhanced security. You know the one-time codes you need to enter before you can log in?
While there are dedicated apps, such as Google Authenticator, to handle these 2FA codes, most modern password managers can generate these codes, too.
An added benefit of having the password manager generate the 2FA code for our logins is that it can autofill the code wherever needed. We don't have to switch apps, copy a code, and paste it ourselves.
Also, there's one less app to keep around.
Now, regardless of which password manager you choose, pick one with cross-platform support.
This is essential because the password manager is the key to your kingdom, and having it available on all major platforms will make it easy to log in to your accounts on any device.
Now, with passwords sorted, let's move on to the next area:
Apps
I have a simple rule for apps: delete the ones I no longer use.
This not only saves space on my devices, but also prevents unnecessary apps from running in the background and slowing down my system.
On a Mac, I use Raycast's Uninstaller to uninstall apps like this:
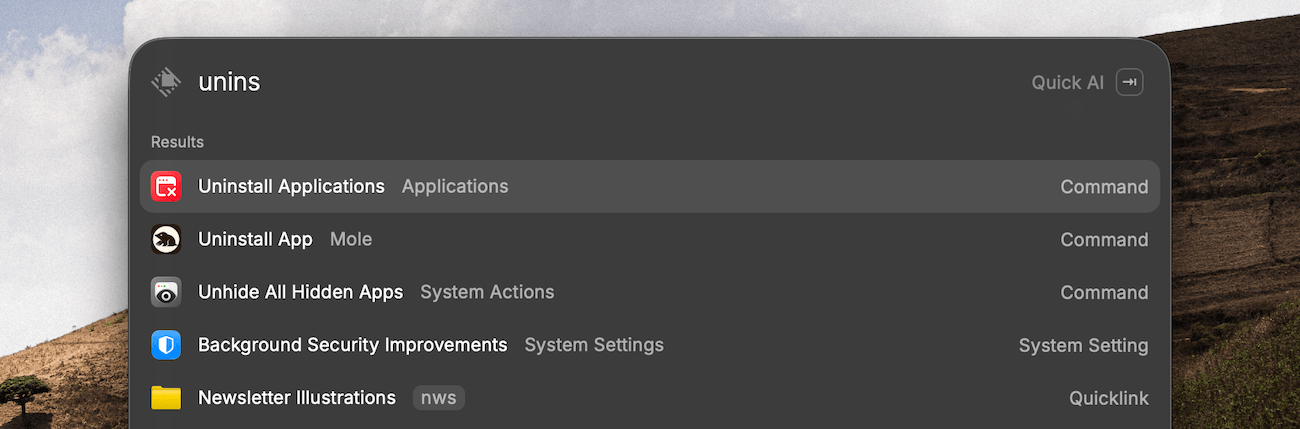
This is slightly better than dragging and dropping an app icon to the trash because Raycast also cleans any leftover files created by the app I'm uninstalling. Thus, clearing more space on my laptop.
On my phone, I take one of these two paths:
- Delete an app from my phone because I don't need it anymore.
- Remove the app from the home screen but keep it installed because I might need the app occasionally, but I don't want it cluttering my phone's home screen.
That's pretty much it for apps.
I don't have a complicated system. I don't group apps under folders because that feels like an extra step when I need to open an app.
This simple act of regularly pruning apps that I don't need keeps my overall workspace less cluttered and more useful.
Lastly, there's one more digital space that often needs decluttering:
Feeds
Our social media feeds are heavily influenced by blackbox algorithms that curate our timeline based on our interaction with content on the platform.
But still, who we subscribe to on YouTube or follow on Twitter or Threads can influence what the algorithm shows on our timeline.
Therefore, I occasionally revisit my social media profiles and my YouTube feed and unsubscribe or unfollow any account that I no longer resonate with.
Moreover, I regularly train the algorithm to show fewer posts that I don't enjoy or connect with.
On YouTube, you can click the three-dot button on a video and choose Not interested or Don't recommend channel:
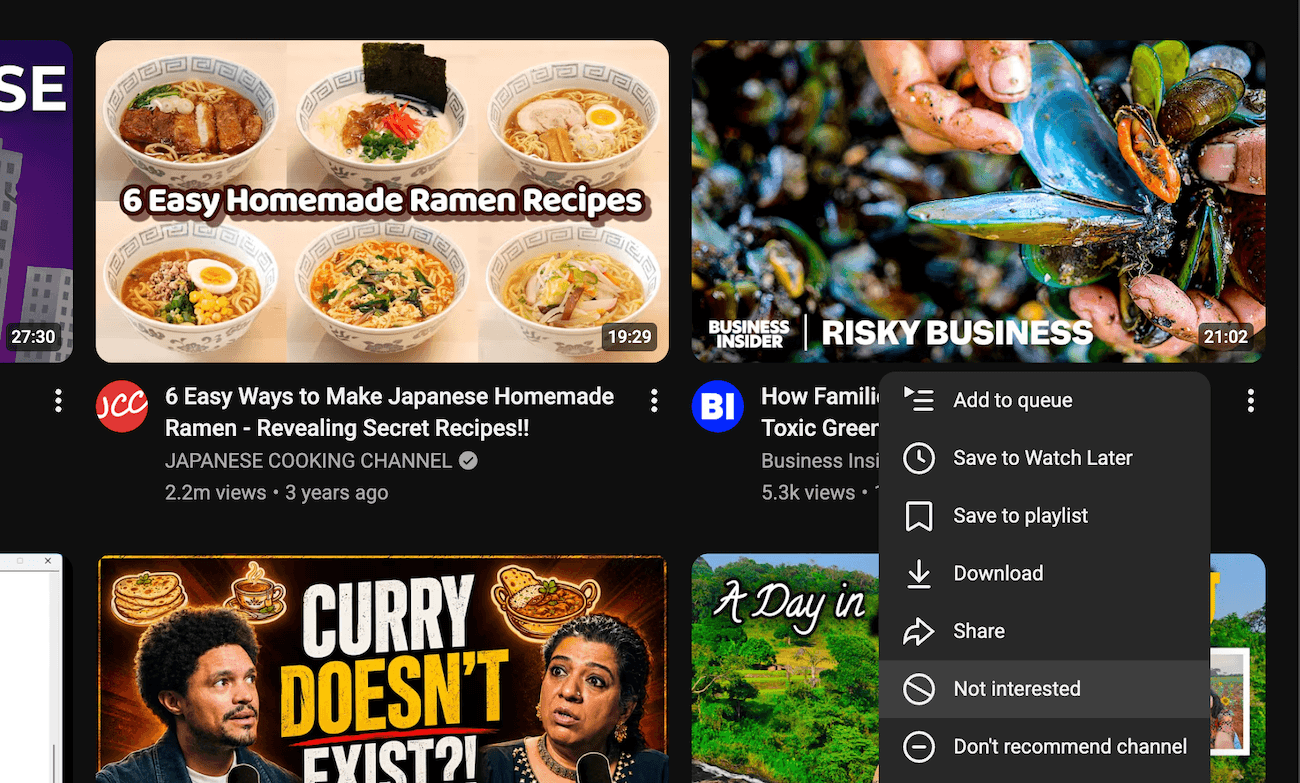
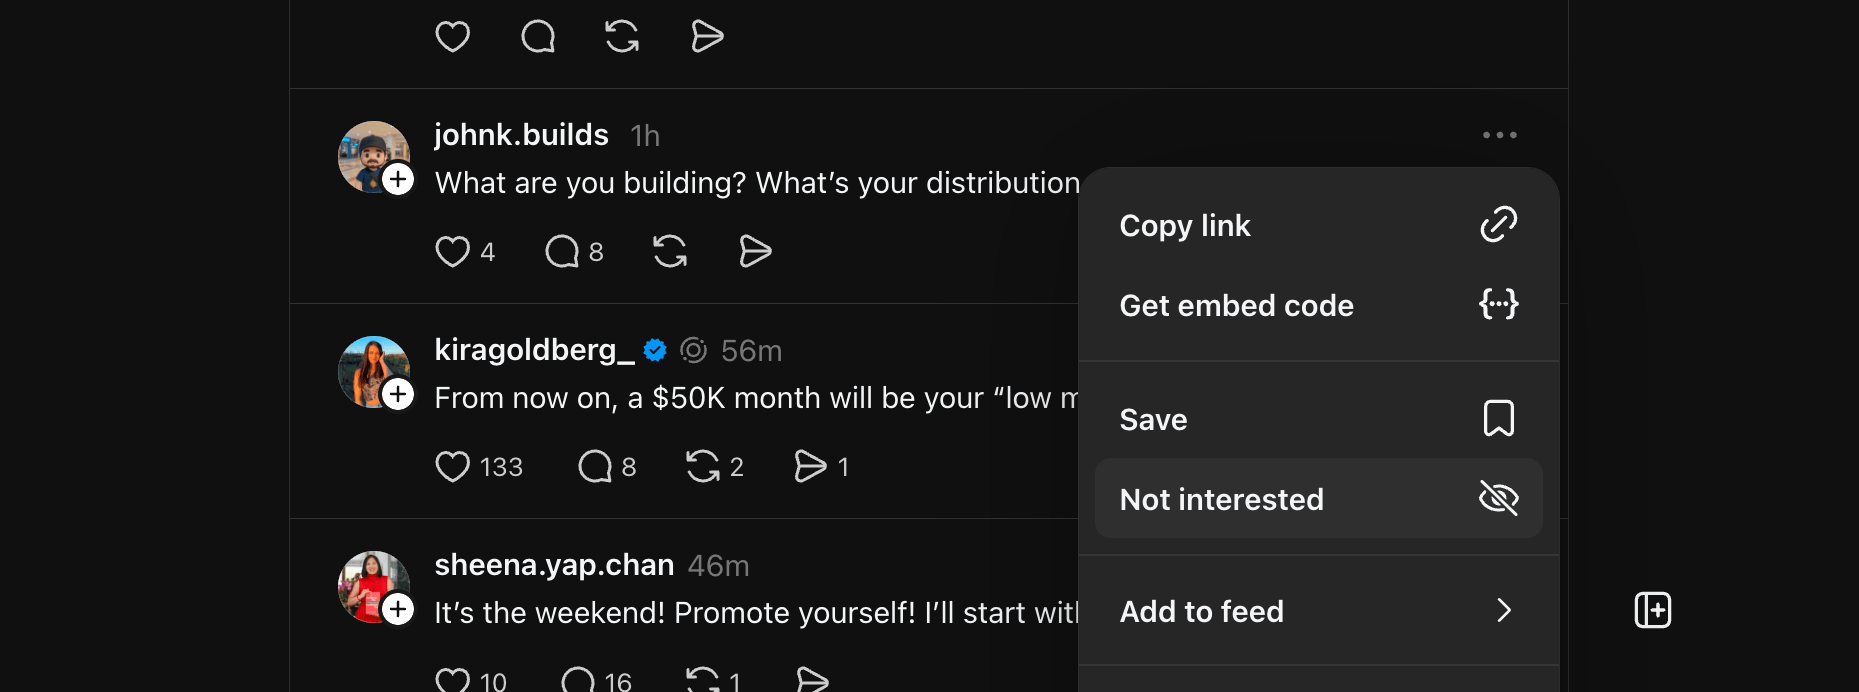
On social media, the process is similar. For example, Threads posts have a Not interested option on every post:
A tiny bit of housekeeping keeps my social media feeds more tuned to what I want to discover rather than showing me what's in trend these days.
Now, if like me, you subscribe to websites via RSS, that stream can get cluttered very quickly, especially if you have high-volume websites, such as news sites, on your list.
This makes the RSS feed difficult to browse, as there's always an endless supply of posts to look at, which in turn, buries the more interesting stuff.
To declutter my RSS feed, I created two new folders called If Free and Wishlist in the RSS app I use, Reeder:
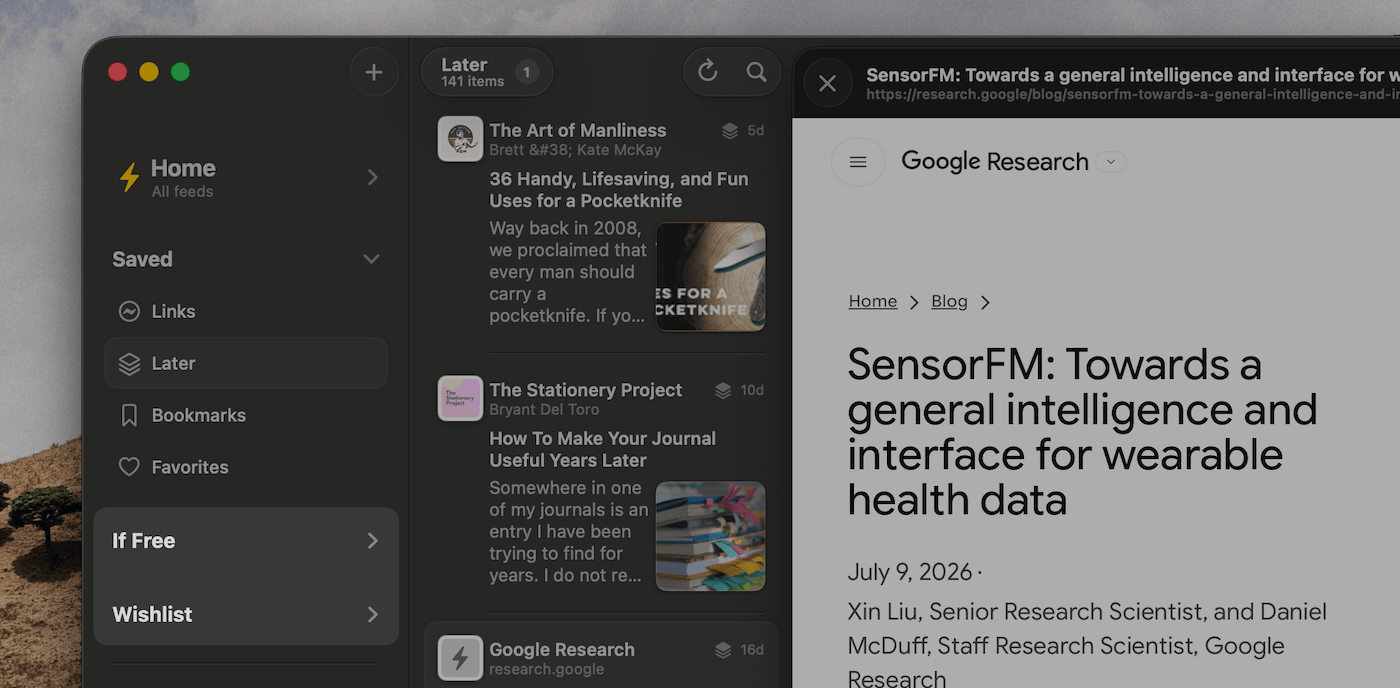
This is how I use these folders:
- If Free: This folder houses feeds from websites that occasionally publish good posts, and I want to look at them after I've exhausted the Home feed and have time for more.
- Wishlist: This folder usually contains high-volume feeds from news sites that might have one or a few interesting posts out of many, and I only look at feeds from this folder after I've exhausted both the Home and If Free feeds.
To ensure the feeds segregated into these folders don't show up in the Home feed, I mark them explicitly to not show in the Home feed by toggling on the Exclude from Home option:
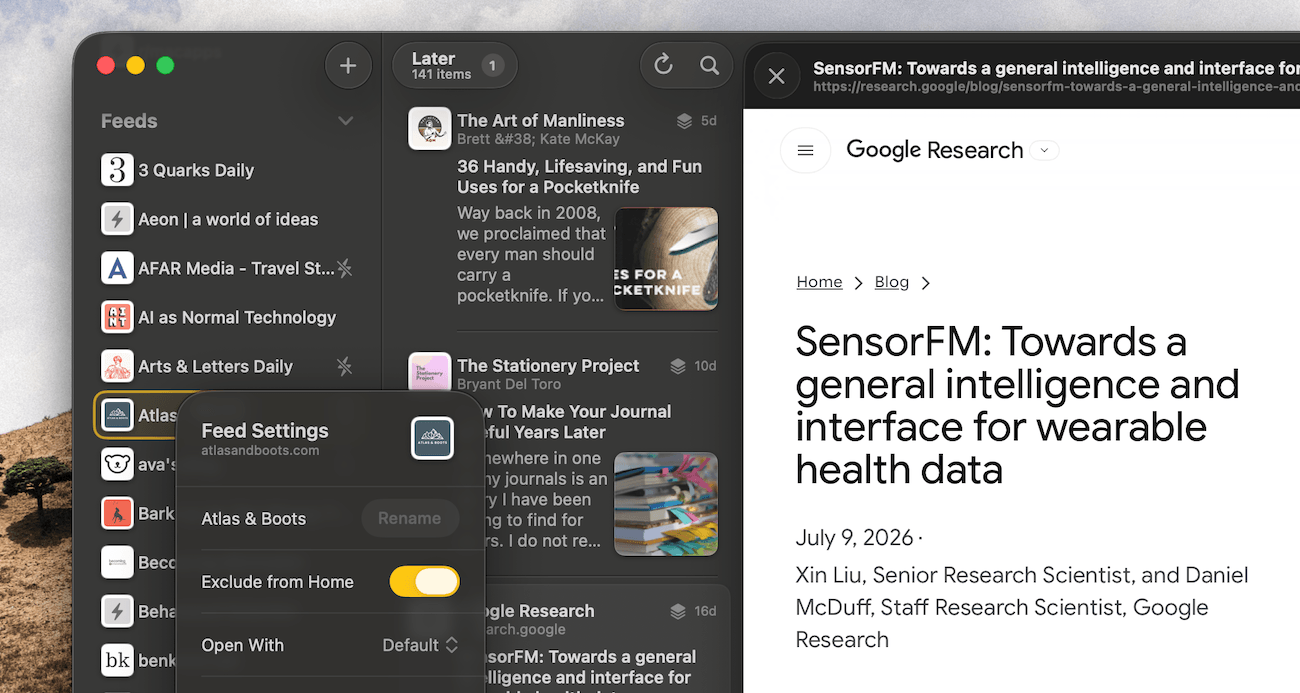
This made the Home feed much more manageable and less noisy. And I still subscribe to the other high-volume or less important blogs using the two other folders.
A win-win situation.
Okay, so now that we've discussed ideas on decluttering many areas of our digital lives:
Where do you start?
Depending on the stage you're at, the whole process might feel overwhelming because there are many areas to attend to.
The best approach here is to start with the area that you think is your biggest bottleneck.
You don't have to follow the exact processes or systems I use. You can selectively pick ideas from the approaches we've discussed here and make systems that work well for you.
Another area where I found decluttering to fit in naturally is when I am transferring over to a new app or service.
For example, when I switch apps, I rarely import my entire data from one app to another.
Instead, I take this opportunity to clean up what's no longer relevant and import only the stuff that still matters.
I did this when I switched my to-do apps; I did this when I switched my password manager and every other app that I have migrated from.
This gives me a chance to clean up some of my old data and not bring any dead weight to the new service.
It's a fresh start, so it's an opportunity for decluttering as well.
I hope this helps. Good luck in decluttering your digital life.
If you're a Hulry Plus member and have questions about the process or a specific area, leave a comment below.